Learn to build a Clojure web app - a step-by-step tutorial
Build your backend in Clojure!
Invest in yourself with my Clojure Web Backend Signature Course.
- 2 web backend modules
- 6 detailed lessons
- 1.9 hours of video

Summary: Learn to build a Clojure web backend from existing components, step-by-step.
Introduction
Objectives
- Learn to build a Clojure web backend from existing components.
- Understand the advantages of building your own stack.
- Ensure that your codebase has a clear structure.
Building your own web stack from small, composable parts is prevalent in the Clojure community. Though some web frameworks are available, I still recommend constructing your own stack as one of the top "frameworks." In this tutorial, you will learn to assemble a complete web application from scratch.
Here's our plan:
- Part 1: Build a minimal "Hello, World!" Clojure web app.
- Part 2: Expand it into a photo-sharing application with users (registration, login, etc.), a database, and an API.
Along the way, you will learn a good deal about the HTTP Specification and how things work under the hood. You can't get that if the framework hides details from you.
Let's get started.
Part 1: A minimal web app
Objectives
- Build a small yet complete web application.
- Practice REPL-Driven Development on our web application.
- Understand how servers, adapters, handlers, requests, and responses work.
The minimal web app we build in part 1 has a small number of parts. Nevertheless, it accepts HTTP requests from the client and returns HTTP responses back to the client. It will form the base on which to build the rest of the application in part 2.
Our simple "Hello, World!" application will respond the same way to every valid request: a warm welcome message in HTML. This might seem too trivial, but it will teach us the essential parts of a Clojure web stack.
Here is a diagram of our application:

By the end of this part, you will understand this diagram and be able to build the server.
Before we build it, let's trace through the steps. This is a straightforward request/response setup. The flow starts in the browser, flows across the top, then back along the bottom.
The browser sends an HTTP Request
First, the browser connects to the server and sends it an HTTP request. The HTTP request is a standard text format that all web clients can generate and all web servers can read. The request looks like this:
Example HTTP Request
GET / HTTP/2
Host: ericnormand.me
User-Agent: curl/7.64.1
Accept: */*
This request is minimal. Many requests are bigger and more complicated. This one is nice because it shows all of the parts in a small space.
The three parts of the request are:
- The request line
- The headers
- The body (optional)
Each part is made of other subparts. Let's go over each part in turn.
The request line
The HTTP request line is the first line of the HTTP request.
GET / HTTP/2
Host: ericnormand.me
User-Agent: curl/7.64.1
Accept: */*
It has three pieces of information, separated by a space:
- The request method
- The path
- The HTTP protocol version
HTTP protocol version
Example: HTTP/2
The HTTP protocol version is a detail that we won't cover here. As HTTP has evolved over the years, new versions have been released. Versions are backward- and forward-compatible, so all web clients and web servers, regardless of the versions they use, can still interoperate. It's one aspect that keeps the web running.
Request method
Example: GET
The other parts of the request line are critical. The request method indicates
the type of request that we are doing. GET is a standard request method that
means we want to download a resource such as a web page. Other standard request
methods mean different things. We'll learn about those later. Our first, simple
server pays no attention to the request method and treats all requests the same.
Path
Example: /
The path is the part of the URL after the hostname. It indicates the resource
the request is trying to access. In this request, we request the resource at
/, which is the "homepage" of the site. We could also request any other path,
such as /about or /js/script.js. In the HTTP standard, each path indicates a
different resource.
The headers
While the request line has a limited format, the HTTP headers give you a space for more flexible, key-value data. Each header has a name, followed by a colon, then the value.
GET / HTTP/2
Host: ericnormand.me
User-Agent: curl/7.64.1
Accept: */*
This request has three headers:
Host: ericnormand.meUser-Agent: curl/7.64.1Accept: */*
The first header (Host) is standard. It indicates the hostname from the URL
that was requested. It may seem unnecessary: doesn't the server know its
hostname? Not always. Sometimes, the same server is used for multiple hosts. For
example, your application might give custom domains to each user:
eric.myapp.comsusan.myapp.comcurtis.myapp.comfatoumata.myapp.com
The second header (User-Agent) is also standard. It's added by curl (the
command-line tool I used to generate this request). It's a courtesy to say which
client is making the request.
The third header (Accept) tells the server what kind of data format the client
would like. In this case (*/*), the client has no preference and will accept
any format. This header is part of the content
negotiation process, which
is typically part of handling a request. It lets clients download versions of
the resource in different formats (JSON, XML, HTML, etc.). Our dead-simple
application won't do content negotiation, but we will see it in our real
application in part 2.
Header names are typically capitalized. If they have more than one word, the
words are separated by hyphens instead of spaces, as in User-Agent. Though
they are typically capitalized, the case is not significant. host and Host
indicate the same header.
Here is a list of standard HTTP headers.
The header section ends with a blank line.
The body
The body is the final section. However, it is optional. The body is where the
client can send data to the server. GET requests typically don't have a body
since they request a download, not submit data. We won't deal with request
bodies in this super simple application. But we will have HTTP response bodies,
which are very similar. We'll see them in just a moment.
Using curl
For this tutorial, we will use curl as a web client to issue HTTP requests and examine the HTTP requests and responses. (curl installation instructions). For example, you can send an HTTP request with this curl command:
curl -v https://ericnormand.me
The -v flag tells curl to print verbose output, which includes tons of
information. Among that information are the HTTP request and the HTTP response.
$ curl -v https://ericnormand.me
*   Trying 76.76.21.21...
* TCP_NODELAY set
* Connected to ericnormand.me (76.76.21.21) port 443 (#0)
* ALPN, offering h2
* ALPN, offering http/1.1
* successfully set certificate verify locations:
*   CAfile: /etc/ssl/cert.pem
  CApath: none
* TLSv1.2 (OUT), TLS handshake, Client hello (1):
* TLSv1.2 (IN), TLS handshake, Server hello (2):
* TLSv1.2 (IN), TLS handshake, Certificate (11):
* TLSv1.2 (IN), TLS handshake, Server key exchange (12):
* TLSv1.2 (IN), TLS handshake, Server finished (14):
* TLSv1.2 (OUT), TLS handshake, Client key exchange (16):
* TLSv1.2 (OUT), TLS change cipher, Change cipher spec (1):
* TLSv1.2 (OUT), TLS handshake, Finished (20):
* TLSv1.2 (IN), TLS change cipher, Change cipher spec (1):
* TLSv1.2 (IN), TLS handshake, Finished (20):
* SSL connection using TLSv1.2 / ECDHE-RSA-AES256-GCM-SHA384
* ALPN, server accepted to use h2
* Server certificate:
*  subject: CN=*.ericnormand.me
*  start date: Mar 16 13:01:56 2021 GMT
*  expire date: Jun 14 13:01:56 2021 GMT
*  subjectAltName: host "ericnormand.me" matched cert's "ericnormand.me"
*  issuer: C=US; O=Let's Encrypt; CN=R3
*  SSL certificate verify ok.
* Using HTTP2, server supports multi-use
* Connection state changed (HTTP/2 confirmed)
* Copying HTTP/2 data in stream buffer to connection buffer after upgrade: len=0
* Using Stream ID: 1 (easy handle 0x7fd8ef80ca00)
> GET / HTTP/2
> Host: ericnormand.me
> User-Agent: curl/7.64.1
> Accept: */*
>
* Connection state changed (MAX_CONCURRENT_STREAMS == 128)!
< HTTP/2 200
< date: Thu, 18 Mar 2021 14:53:54 GMT
< content-type: text/html; charset=utf-8
< content-disposition: inline; filename="index"
< cache-control: public, max-age=0, must-revalidate
< content-length: 6755
< access-control-allow-origin: *
< etag: W/"1c40a9d59741120a0b78141aaf49c5c41e27d1faef61c4e785b05187036e970b"
< accept-ranges: bytes
< x-vercel-cache: MISS
< age: 0
< server: Vercel
< x-vercel-id: cle1::qsqqb-1616079234128-f8db242c476c
< strict-transport-security: max-age=63072000
<
<!DOCTYPE html><html><head>...
* Closing connection 0
The verbose output shows a ton of information, including the IP address, the HTTPS handshake, and the protocol version negotiation (figuring out that both client and server support HTTP/2). These may be important for debugging, but usually, they can be ignored. Here are the parts to pay attention to:
- The request - indicated by the
>prefix on each line - The response - indicated by
<on each line
The server parses the request
There are many servers on the Java Virtual Machine. Here are just a few:
- Jetty
- Netty
- Vert.x
- Undertow
These are different implementations of the same HTTP protocol. They parse standard HTTP requests and create convenient Java objects that represent the requests. We won't go into detail about how that process works. Most Clojure developers pick a server without knowing many details about how it works.
We will use the Jetty web server. It comes standard with Ring, and it works for most purposes.
The Ring adapter converts the server's representation to a Ring request
Each server uses a different Java class to represent the request. The adapter's purpose is to convert the server's custom Java request class into a standardized Ring request. Once it has transformed the custom class into a standard Ring request, we are in the realm of Ring apps.
Each Java web server has a corresponding Ring adapter. The Jetty server has a Jetty adapter. The Undertow server has an Undertow adapter. Each Ring adapter is specialized to convert one server's custom class.
The adapter isolates your code from changes to the web server. For example, you could start developing your application using Jetty, but choose to switch to Netty later if you need to. In theory, you won't have to change any code in your application. Likewise, you could run Jetty to develop your code on your local machine but run Undertow in production. Again, the adapter should shield your code from the difference. After all, it doesn't deal with the custom Java request and response classes. Instead, it deals with standard Ring requests, which have the same format regardless of the server.
In practice, this works 99% of the time. However, I have encountered a few corner cases where you have to be careful. We will be switching the server out in our simple web app. We'll explore the differences at that time and learn how to avoid the problems.
The Ring request
Let's take a look at our HTTP request once it has been converted to a Ring request.
HTTP request
GET / HTTP/2
Host: ericnormand.me
User-Agent: curl/7.64.1
Accept: */*
Ring request
{:ssl-client-cert nil,
 :protocol "HTTP/2",
 :remote-addr "[0:0:0:0:0:0:0:1]",
 :headers {"accept" "*/*",
           "user-agent" "curl/7.64.1",
           "host" "ericnormand.me"},
 :server-port 3001,
 :content-length nil,
 :content-type nil,
 :character-encoding nil,
 :uri "/",
 :server-name "localhost",
 :query-string nil,
 :body #object[org.eclipse.jetty.server.HttpInputOverHTTP 0x4c653787 "HttpInputOverHTTP@4c653787[c=0,q=0,[0]=null,s=STREAM]"],
 :scheme :https,
 :request-method :get}
That's quite a lot bigger. But don't worry, we'll step through the important parts. Just note that everything from the original HTTP request is in there, plus a little more.
Request line
The request line had three parts, the method, the path, and the protocol. We can find these in the Ring request:
- The method is at the key
:request-method. In a Ring request, the method is converted to a lower-case keyword; in this case, it's:get. - The path is at the key
:uri. - The protocol is at the key
:protocol.
Headers
The headers have been parsed into a hash map and stored at the key :headers.
The names of the headers are lower-cased for you. The values are all strings.
Body
The body is at the key :body. The value is a java.io.InputStream. Because
the body can be very large or in a binary format, it has not been parsed for you
into a string. In this case, because the request has no body, the InputStream
will be empty. It is always present, even when it has no data.
There are some extra keys that you may want to use. For now, it's essential to know that everything in the HTTP request is present in the Ring request. No information is lost. The Ring request is simply a convenient format to represent the HTTP request in Clojure.
Also, if it looks like a lot of keys to remember, don't worry. When I first started, I thought there was a lot, too. However, over time I noticed that it wasn't as bad as it first appeared. For one, you are rarely dealing with all of the keys. I've never done anything with the SSL certificate, for instance. Second, in day-to-day work, you are accessing keys that are much more relevant to your domain. We'll see why that is the case later. And, finally, a handy reference for the Ring SPEC fits on a single piece of paper. I made one, printed it out, and hung it on the wall near my computer. If I ever needed to remember the name of a key, it was right there.
The Ring SPEC is an ASCII document that details the keys and value types of Ring requests and Ring responses.
The handler is a function from Ring request to Ring response
The end of the request's journey is the Ring handler. The handler is a Clojure function that takes a Ring request, does some work, and returns a Ring response. The handler does the work of our web application. There are no restrictions on what your handler can do. It can read from files, connect to the database, or even make HTTP requests of its own.
The response's journey back to the client
Once the handler returns a Ring response, the return journey is like the request's journey, only in reverse. The Ring response is converted to the server's response class. The server's response object is converted to an HTTP response, then sent back to the client as text.
Here's what the Ring response looks like. This one contains some HTML:
{:status 200
 :headers {"Content-Type" "text/html"}
 :body "<!DOCTYPE html><html><body>Hello</body></html>"}
This is a Clojure hash map that gets converted to an HTTP response like this:
HTTP/1.1 200 OK
Date: Thu, 18 Mar 2021 17:07:45 GMT
Content-Type: text/html
Content-Length: 46
Server: Jetty(9.4.36.v20210114)

<!DOCTYPE html><html><body>Hello</body></html>
The HTTP response has three parts, like the request:
- The response line
- The headers
- The body
The headers and body are in the same format as the request.
The response line is different. It shows the protocol, the status code, and a
status string. The status code and status string are standard numbers and string
representations of the status of the response. A 200 OK response means
everything is great, and you should expect the resource you requested in the
body. There are many status codes. We'll go over some of the important ones
later. For now, just note that you should set the status code in the Ring
response at the :status key.
The headers are set in the Ring response as a hash map. They are converted to
HTTP headers. You'll notice that only one header was set in the Ring response,
yet the HTTP response has more than one. This is normal. The server and adapter
added other relevant headers. We knew that we were returning HTML, so we added a
Content-Type header of text/html. The adapter figured out the size of the
body in bytes and added a Content-Length header. The server added the Date
and Server headers as well. Because the response can contain any number of
headers, each part of the journey back to the client can add new headers safely.
In fact, this is an essential part of the HTTP protocol and why it works so well. Any HTTP server can be proxied. That means another server (called the proxy) can be put in front of it. The proxy will forward requests it gets to the server. Then it will forward the response it gets back to the client. Along the way, it can modify the request and response, including adding, removing, and modifying headers or completely changing the body. When we write a server, we should keep in mind that the Ring request we handle may not precisely represent the HTTP request the client generates. There could be any number of proxies between the client and our code.
This may seem daunting, but in practice, it is not. We write our code to handle the request we get. We look at the parts relevant to our functionality and ignore what we don't care about. This makes for a robust server that can be proxied. In fact, this same proxying idea is the basis for middleware and interceptors, which we'll see in part 2.
Building our simple application
We're now going to build a Clojure web application that will respond to web requests. It will have the structure we learned in the diagram.
Dependencies
For this project, you're going to need a few things installed on your machine. You will need:
- The Java Development Kit (JDK) and Leiningen (see my guide to installing Clojure to get this set up)
- A terminal or command prompt
- A text editor or IDE, preferably one in which you can connect to a REPL
That's it!
Let's get started.
Creating the Leiningen project
Open your terminal, change to the directory where you want your project to live,
and create a new project with Leiningen. This command will create a new project
called web-dev:
lein new web-dev
Start your editor and open the file web-dev/project.clj, which is the project
file Leiningen just created for you.
It should look something like this:
(defproject web-dev "0.1.0-SNAPSHOT"
  :description "FIXME: write description"
  :url "http://example.com/FIXME"
  :license {:name "EPL-2.0 OR GPL-2.0-or-later WITH Classpath-exception-2.0"
            :url "https://www.eclipse.org/legal/epl-2.0/"}
  :dependencies [[org.clojure/clojure "1.10.1"]]
  :repl-options {:init-ns web-dev.core})
This was created on my machine by Leiningen 2.9.5. Yours may be different if you have a different version of Leiningen.
We will work on this project for the rest of this tutorial.
Setting up the Ring dependency
Let's add the Ring dependency to the project. We need ring-core for
a few utilities it provides and ring-jetty-adapter for the Jetty server and
adapter. Add these lines to your :dependencies vector:
[ring/ring-core          "1.9.1"] ;; essential functions
[ring/ring-jetty-adapter "1.9.1"] ;; Jetty server and adapter
Note: These versions are the most recent as of the time of the last update to this tutorial. I have tested these steps with these particular versions. I have not tested the steps with newer versions. When you're following along, please use these versions in your own project, even if more recent versions are available. I don't want something unexpected to come up for you.
Just to be sure, the whole project.clj should look like this:
(defproject web-dev "0.1.0-SNAPSHOT"
  :description "FIXME: write description"
  :url "http://example.com/FIXME"
  :license {:name "EPL-2.0 OR GPL-2.0-or-later WITH Classpath-exception-2.0"
            :url "https://www.eclipse.org/legal/epl-2.0/"}
  :dependencies [[org.clojure/clojure     "1.10.1"]
                 [ring/ring-core          "1.9.1"]
                 [ring/ring-jetty-adapter "1.9.1"]]
  :repl-options {:init-ns web-dev.core})
Now we've got enough to build a web server. Start your REPL.
Starting the web server
Let's open web-dev/core.clj in our editor. We want to include the
ring.adapter.jetty namespace. We won't need the ring-core library just yet.
Add the following to the namespace (ns) declaration at the top:
(:require [ring.adapter.jetty :as jetty]) ;; `ring.adapter.jetty` namespace aliased as `jetty`
It should now look like this:
(ns web-dev.core
  (:require [ring.adapter.jetty :as jetty]))
Now would be a good time to compile the file to make sure everything is working as expected.
To start the server, we have to run:
(jetty/run-jetty (fn [req] {:status 200 :body "Hello" :headers {}})  ;; a really basic handler
                 {:port 3001     ;; listen on port 3001
                  :join? false}) ;; don't block the main thread
This line runs the Jetty web server and the Jetty adapter. They typically come
together for convenience. The first argument is the handler. In this case, we
use a minimal handler. The second argument to run-jetty is a map of options.
We want to listen on port 3001. That is a required argument. We don't want to
"join" the main thread to the server thread. If we join, the main thread will
block.
Let's run the line and see it work:
curl -v localhost:3001
* Connected to localhost (::1) port 3001 (#0)
> GET / HTTP/1.1
> Host: localhost:3001
> User-Agent: curl/7.64.1
> Accept: */*
>
< HTTP/1.1 200 OK
< Date: Tue, 23 Mar 2021 13:24:38 GMT
< Content-Length: 5
< Server: Jetty(9.4.36.v20210114)
<
* Connection #0 to host localhost left intact
Hello* Closing connection 0
We can see the request and response, along with a simple response body Hello
on the last line. (Text starting with * is information added by curl as part
of the verbose output.)
Congratulations! We have a working web server!
Stopping the server
The code from the previous section will work, but it won't be convenient. We
have no way of stopping the server after starting it. jetty/run-jetty returns
an object that represents the server. That object has a .stop method on it. To
stop the server later, we will need to save the object it returns and call the
.stop method on it.
If you do run the line above and you don't save the returned object, the easiest way to stop the server is to kill the REPL (that is, the whole JVM). Then you need to start it again. We don't want to have to do that because it is slow. We need a way to save the returned object.
Let's wrap this line in a function called start-server so we can call it
multiple times.
(defn start-server []
  (jetty/run-jetty (fn [req] {:status 200 :body "Hello" :headers {}})  ;; a really basic handler
                   {:port 3001      ;; listen on port 3001
                    :join? false})) ;; don't block the main thread
We want a place to save the object run-jetty returns. So let's make an atom:
(defonce server (atom nil))
We defonce (instead of def) so that later, when we reload the file, it won't
overwrite the variable. Using defonce is a typical pattern when doing
Repl-Driven Development. We initialize the atom with nil because we don't
have the server object yet.
Now we can store the return object of run-jetty into this atom.
(defn start-server []
  (reset! server
          (jetty/run-jetty (fn [req] {:status 200 :body "Hello" :headers {}})  ;; a really basic handler
                           {:port 3001       ;; listen on port 3001
                            :join? false}))) ;; don't block the main thread
To stop the server, we need to call the .stop method on the object stored in
the atom.
(defn stop-server []
  (when-some [s @server] ;; check if there is an object in the atom
    (.stop s)            ;; call the .stop method
    (reset! server nil)));; overwrite the atom with nil
Now we can stop and start the server from the REPL. Unfortunately, we already started a server we can't access anymore. Let's kill the JVM and start it again. From now on, we can start and stop the web server without restarting the JVM.
Extracting the handler
The code in the previous section inlines the handler. We won't get very far modifying that.
Let's try anyway to demonstrate how difficult working with it will be. Make sure your web server is running. Then change the message from "Hello" to "Hello, World!".
(defn start-server []
  (reset! server
          (jetty/run-jetty (fn [req] {:status 200 :body "Hello, World!" :headers {}})  ;; a really basic handler
                           {:port 3001       ;; listen on port 3001
                            :join? false}))) ;; don't block the main thread
The change was easy enough, but if we recompile this file and request again, we get the same response as before:
curl localhost:3001
Hello
It is still returning Hello, even though we changed and recompiled the code.
The server was started with a function that returns the "Hello" response. Even
though we changed the code, the server is still running with that original
function. Until we stop and start the server, it will run the original handler.
The solution is to move the handler out of the argument and into a global var
(using def). Then we can call the handler through the var. That will give us
one level of indirection for the dynamic behavior we want.
First, we extract the anonymous handler into a named function (app) at the top
level.
(defn app [req] ;; it is customary to name the handler `app`
  {:status 200 :body "Hello, World!" :headers {}}) ;; same code, now with a name
Then we change how we start the server. Now, we pass in a handler that calls
app.
(defn start-server []
  (reset! server
          (jetty/run-jetty (fn [req] (app req))  ;; call app
                           {:port 3001           ;; listen on port 3001
                            :join? false})))     ;; don't block the main thread
We changed how we start our server, so we should stop and then start it at the REPL:
=> (stop-server)
=> (start-server)
We should verify that the Jetty server is working. It should return Hello, World!
curl localhost:3001
Hello, World!
It worked! To test that we can change the app function and modify the
behavior, change the response from "Hello, World!" to "OMG! How dynamic!":
(defn app [req] ;; it is customary to name the handler `app`
  {:status 200 :body "OMG! How dynamic!" :headers {}})
Compile either this top-level form or the entire file.
Now back to curl:
curl localhost:3001
OMG! How dynamic!
We've now got a decent development workflow. It goes like this:
- Start the web server
- Modify the code
- Recompile (individual forms or the whole file)
- Observe changes (reload the browser, issue curl commands)
- Loop back to 2
Rarely, we may have to stop and start the web server. And even more rarely, we will have to restart the JVM. The important thing is that the typical case is fast.
Q&A: Indirecting app
Q: When we start the server, why are we passing in a function that only calls another function? Can't we just name the function directly?
In other words, why do this:
(jetty/run-jetty (fn [req] (app req)) ...)
and not:
(jetty/run-jetty app ...)
It seems redundant.
It's an excellent question. The short answer is that you need the extra function
to modify the application after starting the server. The second code snippet,
where you pass in app directly, cannot change app after the fact. Let's go
deeper into why that is.
The question points to one of Clojure's features essential to making it a good language for dynamic development. Dynamic development means you can modify and recompile small pieces of code without having to start over. Most languages need your program to be restarted to pick up changes to your code. Clojure lets you make changes as you go.
Clojure does this with an object called a var. They are created every time you
define a variable or top-level function. That means every def or defn
creates a var. They work like this:
Let's say you're defining a function called greeting:
(defn greeting []
  "Hi!")
The first time
The first time you run this code, it will look in the current namespace to see
if there is already something called greeting. Since this is the first time,
it won't find anything. It will create a var called greeting and store it in
the current namespace. A var is just an object with a mutable pointer. It has
some thread-safe semantics that aren't relevant right now. Then it compiles the
function and stores that in the var.
Every time you access greeting in your code, it actually looks up the current
value in the var. So I could write this code:
(defn greet []
  (println (greeting)))
When I call greet, it looks up the current value of greeting, then calls it,
then prints the result. The relevant bit is that it always looks up the
current value of greeting. Right now, that current value always returns
"Hi!".
Subsequent times
The second time, and any subsequent time, you run a def or defn for
greeting, it finds the var in the namespace and replaces the value in the var
with the new value. So when I run this:
(defn greeting []
  "Yo!")
It will replace the old function with the new function. All existing functions
that refer to greeting don't need to be recompiled. They can pick up the
change automatically.
=> (greet)
"Yo!"
nil
We can see how this applies to our server.
If you run this:
(jetty/run-jetty app ...)
It looks up the current value of app and passes it as an argument to start the
server. It only looks up the current value once: at the time the server is
started. If you change the value of app later by re-running its def, the
server will still have the older version.
However, if you run this:
(jetty/run-jetty (fn [req] (app req)) ...)
The server gets a function that looks up the current value of app each time it
is called: once per request! That lets us change the value of app during
development and know that it will be looked up each time.
Q&A: Needing to restart the server
Q: When will we need to restart the server?
You need to restart the server any time you change the code that starts the server. For instance, if we change the port number, we are changing how the server is started. We will need to stop the old server and run the new code that starts the server. If we find ourselves restarting the server very often, we can look for a way to avoid restarting so that we can develop faster. Faster development is easier and more fun.
Swapping out the server
In this optional section, we change web servers and adapters to demonstrate how easy that is.
We have a working web app. It doesn't do much. Here's the diagram again of what it does.
We've built this whole thing. Just for fun, to see if we can, we can swap out the Jetty server and Jetty adapter with an Aleph server and adapter.

Aleph is built on Netty, which is another JVM web server and networking library. I also recommend Aleph as one of the prominent Clojure web servers. Let's get started swapping them out.
Adding the dependency to Aleph
Aleph has its own dependency, so we will need to:
- Shut down the JVM
- Add the Aleph dependency to the
project.clj - Start the REPL again
Then we can modify our code.
Shut down the JVM now.
Our existing project.clj look like this:
(defproject web-dev "0.1.0-SNAPSHOT"
  :description "FIXME: write description"
  :url "http://example.com/FIXME"
  :license {:name "EPL-2.0 OR GPL-2.0-or-later WITH Classpath-exception-2.0"
            :url "https://www.eclipse.org/legal/epl-2.0/"}
  :dependencies [[org.clojure/clojure     "1.10.1"]
                 [ring/ring-core          "1.9.1"]
                 [ring/ring-jetty-adapter "1.9.1"]]
  :repl-options {:init-ns web-dev.core})
Let's leave the ring-ring-jetty-adapter dependency (though we won't use it
right now) and simply add the Aleph dependency. We'll swap the Jetty server back
in at the end.
Add this line to the dependencies:
[aleph "0.4.6"]
This is the current version of Aleph at the time of writing. I suggest you stick with this version during this tutorial because everything has been tested using this version and not newer versions.
Our project.clj should now look like this:
(defproject web-dev "0.1.0-SNAPSHOT"
  :description "FIXME: write description"
  :url "http://example.com/FIXME"
  :license {:name "EPL-2.0 OR GPL-2.0-or-later WITH Classpath-exception-2.0"
            :url "https://www.eclipse.org/legal/epl-2.0/"}
  :dependencies [[org.clojure/clojure     "1.10.1"]
                 [ring/ring-core          "1.9.1"]
                 [ring/ring-jetty-adapter "1.9.1"]
                 [aleph                   "0.4.6"]]
  :repl-options {:init-ns web-dev.core})
Now start the REPL again.
Starting the Aleph server
We have the dependency loaded into our REPL. Now we need to require the namespace and start the Aleph server instead of Jetty.
Open web-dev/src/web-dev/core.clj. Compile the file to make sure everything
works.
Now add this namespace dependency to the ns declaration:
[aleph.http :as aleph]
It should now look like:
(ns web-dev.core
  (:require [ring.adapter.jetty :as jetty]
            [aleph.http         :as aleph]))
We'll leave the jetty namespace for now because we will swap it back later. If
you do want to remove it, you should do so last. There are still references to
functions in that namespace. If you compile the file without the dependency, you
will have errors. Once you remove all references to functions in the namespace,
you can safely remove the require.
Compile the ns form to load the new dependency.
Now start the server with this line:
=> (aleph/start-server (fn [req] (app req)) {:port 3001})
Here's our existing start-server:
(defn start-server []
  (reset! server
          (jetty/run-jetty (fn [req] (app req))  ;; a really basic handler
                           {:port 3001       ;; listen on port 3001
                            :join? false}))) ;; don't block the main thread
Let's comment out the call to jetty/run-jetty and add our aleph/start-server
call.
(defn start-server []
  (reset! server
          (aleph/start-server (fn [req] (app req)) {:port 3001})
          #_(jetty/run-jetty (fn [req] (app req))  ;; a really basic handler
                           {:port 3001       ;; listen on port 3001
                            :join? false}))) ;; don't block the main thread
Notice that we used the #_ comment shortcut to ignore the following
expression. start-server will save the return value of aleph/start-server to
the atom.
We don't specify :join? false because Aleph does not block the current thread
by default.
Lastly, we modify the stop-server function. Aleph's returned object, which
represents the running server, uses the .close method, not the .stop method.
Here's our existing code:
(defn stop-server []
  (when-some [s @server] ;; check if there is an object in the atom
    (.stop s)            ;; call the .stop method
    (reset! server nil)));; overwrite the atom with nil
Let's comment out (.stop s) and add (.close s)
(defn stop-server []
  (when-some [s @server] ;; check if there is an object in the atom
    (.close s)
    ;;(.stop s)            ;; call the .stop method
    (reset! server nil)));; overwrite the atom with nil
Okay, let's compile the file. Then start the server.
Now we test it with curl:
curl localhost:3001
We modify the handler to see if it can pick up changes. Change the handler to have a different body. Here's our code:
(defn app [req]
  {:status 200 :body "Hello, World!" :headers {}})
We can change "Hello, World!" to "Greetings, human!":
(defn app [req]
  {:status 200 :body "Greetings, human!" :headers {}})
Recompile just this function and re-run curl. You should see the new message.
Q&A: Ease of swapping servers
Q: Is swapping servers really so easy?
We swapped web servers and adapters with only a few lines of code. It demonstrated how Ring isolates us from the particular web server we choose. Practically, it means we don't have to spend much time upfront worrying about which web server to use. We can always change it easily later.
We ran a few tests and our servers appeared to work the same. However, there are differences that we did not encounter. Usually, these differences shouldn't matter. And there are some guidelines you can follow to avoid the differences.
Guidelines
- Don't depend on the type of request. Treat it as a hash map without checking.
- Don't use
contains?to see if a key has a value. Get the value out instead and expectnilto mean it doesn't have a value. - Don't depend on enumerating the keys.
We will go over each briefly.
1. Don't depend on the type of the request.
Ring specifies that a request is a hash map with well-defined keys and values. If you ask for the type of a request using the Jetty adapter, you'll get this:
(type jetty-req) ;=> clojure.lang.PersistentHashMap
However, if you ask for the type of a request using the Aleph adapter, you get:
(type aleph-req) ;=> aleph.http.core.NettyRequest
What gives?
Well, for performance reasons, Aleph does not create a hash map. It creates a faster proxy object that looks like a hash map. Some other adapters do something similar. In practice, if you just treat the request like a hash map, you'll be fine. If you peek under the hood to see if it actually is a hash map, your code will break when you change servers.
2. Don't use contains? to see if a key has a value.
Sometimes the absence of a key in a request is significant. You might check if
the key is in the request using contains? like so:
(contains? request :query-string)
And that might work for some adapters. Other adapters will include the
:query-string key with a nil value. And the ones that have custom objects,
like Aleph, will say they contain all standard keys, even if there is no value.
It's best to check if the request contains the key by getting the value and
seeing if it's nil:
(nil? (get request :query-string))
This approach unifies the two possibilities. If you always check for nil,
your code will work universally.
3. Don't depend on enumerating the keys.
A similar issue comes up when you enumerate the keys of the request using
keys. In short, if you enumerate keys, you still need to check if the value
for any particular key is nil.
In my experience, sticking to these three guidelines will eliminate the practical differences between different adapters. Further, the guidelines don't impose much cost.
Swapping the server back
Let's swap the Aleph server back to the Jetty server.
First, let's be sure to stop the server.
=> (stop-server)
We need to change two functions, start-server and stop-server. All we need
to do is comment out the Aleph lines and uncomment the Jetty lines.
(defn start-server []
  (reset! server
          #_(aleph/start-server (fn [req] (app req)) {:port 3001})
          (jetty/run-jetty (fn [req] (app req))  ;; a really basic handler
                           {:port 3001       ;; listen on port 3001
                            :join? false}))) ;; don't block the main thread

(defn stop-server []
  (when-some [s @server] ;; check if there is an object in the atom
    ;;(.close s)
    (.stop s)            ;; call the .stop method
    (reset! server nil)));; overwrite the atom with nil
Now we can start the server again:
=> (start-server)
We can also comment out the Aleph namespace dependency.
(ns web-dev.core
  (:require [ring.adapter.jetty :as jetty]
            #_[aleph.http         :as aleph]))
When we do a deep cleanup, we can remove the commented expressions.
Stating the return type
Right now, we're returning a plain text message. However, we're not clear about that and that's impolite in HTTP land. We should say that we return plain text so the client knows what to do with it.
We do that by adding a Content-Type header with the text/plain MIME type. MIME
types are standard string descriptions of different file formats. The two basic
types are:
text/plain: plain text filesapplication/octet-stream: binary files
You should use these when you don't know the format or if the format doesn't matter. There is a standard process for registering new MIME types and many have been registered. Here is the giant list of MIME TYPES. Mozilla has a shorter list of MIME types that are most important for web formats.
Let's make our handler indicate the return type. It's just plain text, so let's say that explicitly. Here's our handler:
(defn app [req]
  {:status 200
   :body "Greetings, human!"
   :headers {}})
All we have to do is add a Content-Type header:
(defn app [req]
  {:status 200
   :body "Greetings, human!"
   :headers {"Content-Type" "text/plain"}})
Recompile. We won't see the headers in the browser. But we can see it in curl:
curl -v localhost:3001
< HTTP/1.1 200 OK
< Content-Type: text/plain
< Server: Aleph/0.4.4
< Connection: Keep-Alive
< Date: Thu, 01 Apr 2021 14:57:24 GMT
< content-length: 15
We see the Content-Type header! Nice. The process of choosing what format to
return is called content negotiation. Because our stack is minimal, we get to
control this header directly. In part 2, when we build a more sophisticated
stack, it will do content negotiation automatically.
Returning JSON
Right now, we return a plain text string. Let's return some JSON. Out of the box, our stack has no specific support for any formats. It just sends what we tell it. We could add a dependency for a JSON library and use it to generate JSON. But that would distract us from understanding the low-level functionality. Let's return JSON with the least work possible.
To do that, we can modify our handler. We can return a JSON-formatted string in
the body and an application/json Content-Type header.
(defn app [req]
  {:status 200
   :body "{\"greeting\": \"Hello, World!\"}"
   :headers {"Content-Type" "application/json"}})
Recompile and check it in curl
curl -v localhost:3001
< HTTP/1.1 200 OK
< Content-Type: application/json
< Server: Aleph/0.4.4
< Connection: Keep-Alive
< Date: Thu, 01 Apr 2021 16:44:15 GMT
< content-length: 29
<
* Connection #0 to host localhost left intact
{"greeting": "Hello, World!"}
Printing out the Ring request
I like to make a handler that can print out the request. It lets me understand what request the handler is seeing so I can debug issues or just get a better idea of what's happening. Let's do it. It's not hard to do. And it will come in handy when we learn middleware.
Let's change the app to return a body that is a string representation of the
request.
(defn app [req]
  {:status 200
   :body (pr-str req)
   :headers {"Content-Type" "text/plain"}})
We change the Content-Type to text/plain and we pr-str the request so to
make a string representation. Recompile it and hit it with curl:
curl localhost:3001
{:ssl-client-cert nil, :protocol "HTTP/1.1", :remote-addr "[0:0:0:0:0:0:0:1]", :headers {"accept" "*/*", "user-agent" "curl/7.64.1", "host" "localhost:3001"}, :server-port 3001, :content-length nil, :content-type nil, :character-encoding nil, :uri "/", :server-name "localhost", :query-string nil, :body #object[org.eclipse.jetty.server.HttpInputOverHTTP 0x7403e24f "HttpInputOverHTTP@7403e24f[c=0,q=0,[0]=null,s=STREAM]"], :scheme :http, :request-method :get}
That contains the request. We can see the expected parts of the request, such as
:headers and :uri. However, it's a little hard to read since it's all on one
line. We can do better with a built-in namespace called clojure.pprint.
First, add the dependency to the ns declaration:
(ns web-dev.core
  (:require [ring.adapter.jetty :as jetty]
            #_[aleph.http         :as aleph]
            [clojure.pprint     :as pprint]))
Now change the handler to use pprint/pprint instead. Unfortunately, pprint
does not have a direct way to print to a string. It prints to standard out. We
have to wrap the call to pprint in a macro that will capture the output to a
string. It's called with-out-str.
(defn app [req]
  {:status 200
   :body (with-out-str (pprint/pprint req))
   :headers {"Content-Type" "text/plain"}})
pprint/pprint does "pretty printing" which takes account of the length of the
keys and values to break it up into multiple lines. Usually, this is easier to
read than a single line. Recompile and hit it with curl again. Here's what I
get:
{:ssl-client-cert nil,
 :protocol "HTTP/1.1",
 :remote-addr "[0:0:0:0:0:0:0:1]",
 :headers
 {"accept" "*/*", "user-agent" "curl/7.64.1", "host" "localhost:3001"},
 :server-port 3001,
 :content-length nil,
 :content-type nil,
 :character-encoding nil,
 :uri "/",
 :server-name "localhost",
 :query-string nil,
 :body
 #object[org.eclipse.jetty.server.HttpInputOverHTTP 0x6797d6a3 "HttpInputOverHTTP@6797d6a3[c=0,q=0,[0]=null,s=STREAM]"],
 :scheme :http,
 :request-method :get}
That's much better. Try it in the browser.
Responding differently to different URLs
At the moment, no matter what URL we request, the same handler is being called. Typically, different URLs will do different things. Let's make our application a little more sophisticated. Let's have three different URLs that we listen on and respond with a "404 Not Found" in all other cases:
/will show a basic homepage./greetingwill show our "Hello, World!" message./echowill respond with a text representation of the Ring request.
All other URLs will respond with a "not found" status. The process of doing different things based on the URL is called routing. We can do a very simple version of routing by hand using conditionals. That will help us understand what is going on. We can then swap in a more feature-complete routing library.
Let's get started.
We add a case expression to our app handler. case is great when you want
to compare a value to multiple literal values and do different things based on
which one matches.
Just as a reminder, here's our existing code:
(defn app [req]
  {:status 200
   :body (with-out-str (pprint/pprint req))
   :headers {"Content-Type" "text/plain"}})
We wrap the response map in a case:
(defn app [req]
  (case (:uri req)
    {:status 200
     :body (with-out-str (pprint/pprint req))
     :headers {"Content-Type" "text/plain"}}))
This shouldn't change the behavior of the server. The case expression allows
a default expression in case none of the values match. Since we don't have
values, our response map will be the default. You can test that with curl.
However, that's not the behavior we want. We actually want it to respond with a
text representation of the Ring request when the path is equal to "/echo".
Let's add that to the case:
(defn app [req]
  (case (:uri req)
    "/echo" {:status 200
             :body (with-out-str (pprint/pprint req))
             :headers {"Content-Type" "text/plain"}}))
Recompile this and test the /echo path with curl:
curl localhost:3001/echo
It should work correctly. Now test a different path:
curl localhost:3001
That should spit out an HTML representation of a stack trace. Raw HTML is not fun to read. It's better to see it in the browser.
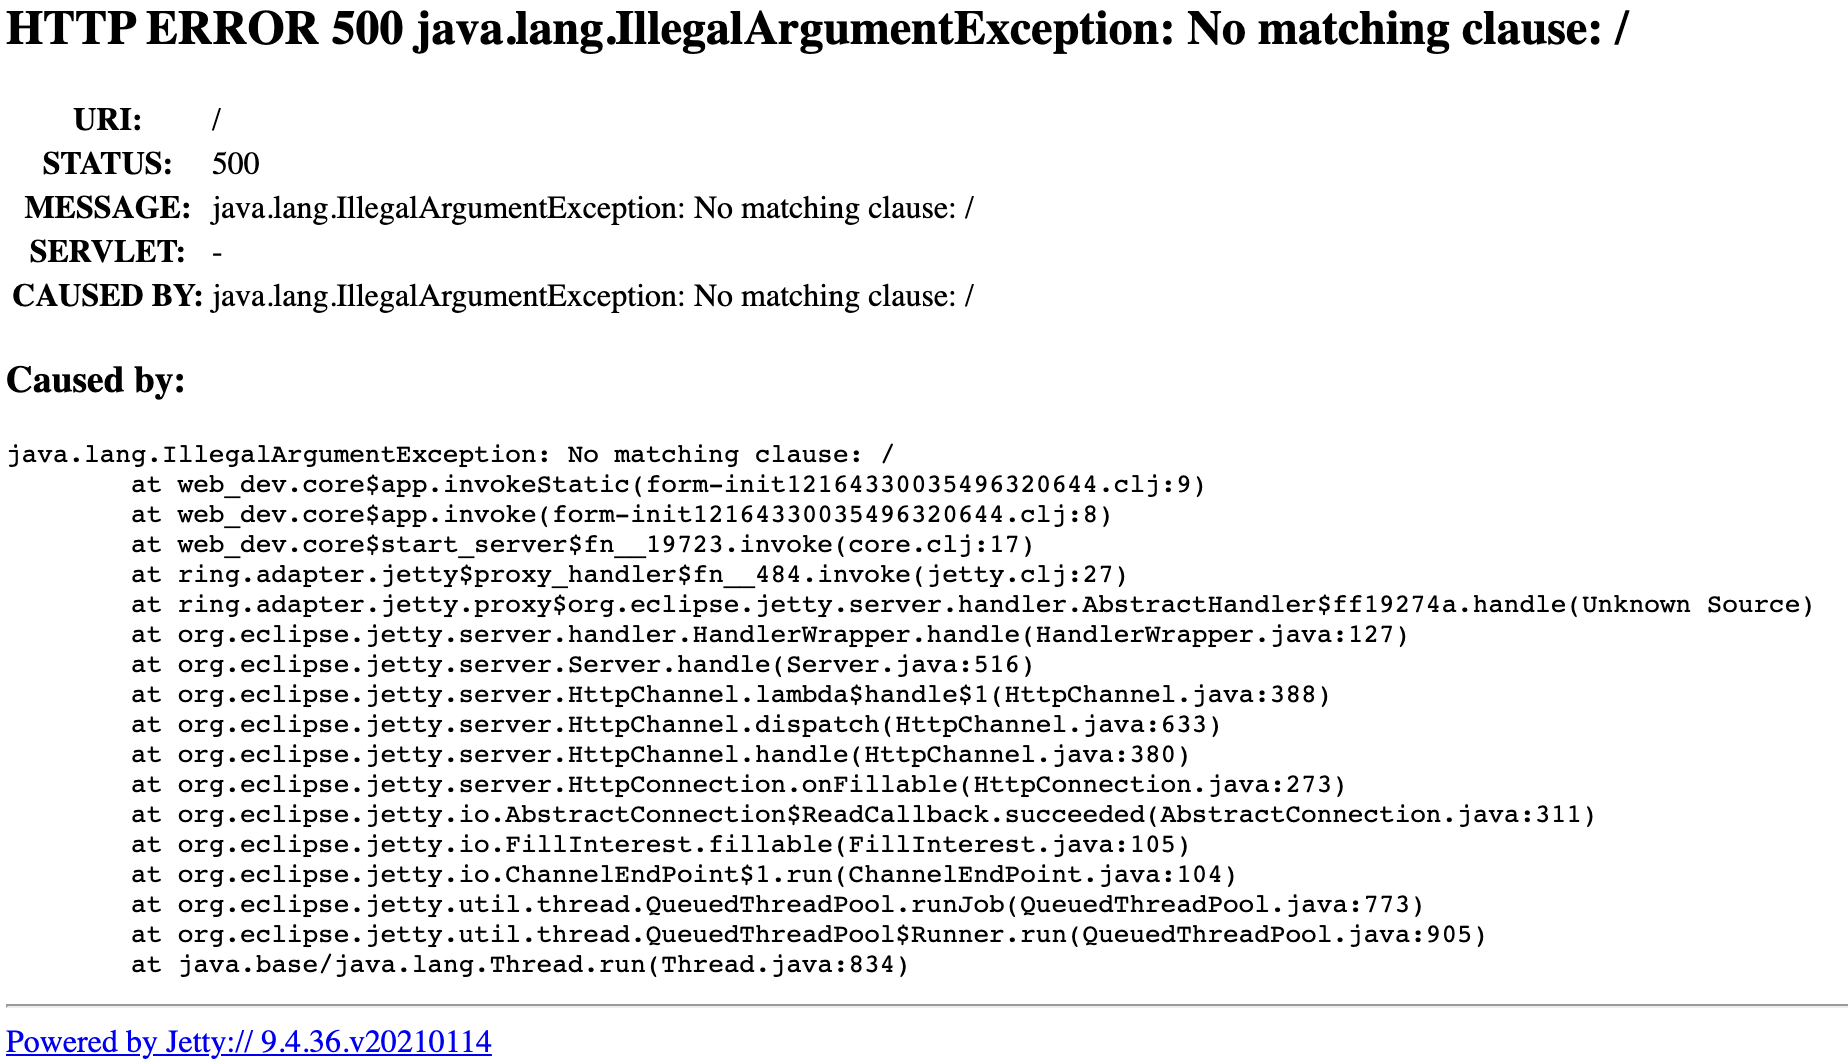
Jetty is reporting an error: We have no matching clause in our case statement
for the / path.
Notice also how Ring has caught the error. If an error is thrown during a
request and nothing catches it, it will bubble up to Ring to handle. Usually, it
turns it into a 500 Server Error.
Let's add a simple 404 Not Found response. We'll make it the default, so if an
unknown path is requested, we'll return that instead of throwing an error.
(defn app [req]
  (case (:uri req)
    "/echo" {:status 200
             :body (with-out-str (pprint/pprint req))
             :headers {"Content-Type" "text/plain"}}
    {:status 404
     :body "Not found."
     :headers {"Content-Type" "text/plain"}}))
Recompile and give it a test drive.
curl localhost:3001
It gives us a 404 status response. Now we've got the default covered. Let's add
two more routes. The first is /, our home page. We can add a new clause to our
case. Here's a first pass, just to get the boilerplate done.
(defn app [req]
  (case (:uri req)
    "/" {:status 200
         :body "Homepage"
         :headers {"Content-Type" "text/plain"}}
    "/echo" {:status 200
             :body (with-out-str (pprint/pprint req))
             :headers {"Content-Type" "text/plain"}}
    {:status 404
     :body "Not found."
     :headers {"Content-Type" "text/plain"}}))
We've set up a new route with a plain text message. It just says "Homepage".
Test it out if you want. We want this response to be HTML so we can add some
links and basic styling. Normally, we'd use a templating language to generate
HTML, but for simplicity, let's hard code an HTML string. First, let's change
the content type to "text/html; charset=UTF-8", the standard content type for
HTML.
(defn app [req]
  (case (:uri req)
    "/" {:status 200
         :body "Homepage"
         :headers {"Content-Type" "text/html; charset=UTF-8"}}
    "/echo" {:status 200
             :body (with-out-str (pprint/pprint req))
             :headers {"Content-Type" "text/plain"}}
    {:status 404
     :body "Not found."
     :headers {"Content-Type" "text/plain"}}))
You can test it now in the browser.
Now we add some markup and two links to our other pages.
(defn app [req]
  (case (:uri req)
    "/" {:status 200
         :body "<h1>Homepage</h1>
                <ul>
                    <li><a href=\"/echo\">Echo request</a></li>
                    <li><a href=\"/greeting\">Greeting</a></li>
                </ul>"
         :headers {"Content-Type" "text/html; charset=UTF-8"}}
    "/echo" {:status 200
             :body (with-out-str (pprint/pprint req))
             :headers {"Content-Type" "text/plain"}}
    {:status 404
     :body "Not found."
     :headers {"Content-Type" "text/plain"}}))
We use a multi-line string with HTML. Later, in part 2, we will learn to use Hiccup to generate HTML. For now, this will work. Recompile and test it in your browser. Click on the links to see what happens.
The /echo link sends us to the echoed response page. But the /greeting link
still responds 404. Let's add the /greeting route.
(defn app [req]
  (case (:uri req)
    "/" {:status 200
         :body "<h1>Homepage</h1>
                <ul>
                    <li><a href=\"/echo\">Echo request</a></li>
                    <li><a href=\"/greeting\">Greeting</a></li>
                </ul>"
         :headers {"Content-Type" "text/html; charset=UTF-8"}}
    "/echo" {:status 200
             :body (with-out-str (pprint/pprint req))
             :headers {"Content-Type" "text/plain"}}
    "/greeting" {:status 200
                 :body "Hello, World!"
                 :headers {"Content-Type" "text/plain"}}
    {:status 404
     :body "Not found."
     :headers {"Content-Type" "text/plain"}}))
With this last change, all of our links work and we respond correctly with a 404 when the path is unknown.
Routing with Compojure
The routing we are doing now works for a simple application like ours with only
three links. As your needs expand, a case statement won't be enough. Many
routing libraries give you a more sophisticated way to route your
application. I recommend a library called
Compojure if you're just
getting started. It is widely used and works well.
Let's add the Compojure dependency.
First, kill the REPL.
In project.clj, add the following dependency:
[compojure "1.6.2"]
Note: These versions are the most recent as of the time of the last update to this tutorial. I have tested these steps with these particular versions. I have not tested the steps with newer versions. When you're following along with this tutorial, please use these versions in your own project, even if more recent versions are available. I don't want something unexpected to come up for you.
Your project file should look like this:
(defproject web-dev "0.1.0-SNAPSHOT"
  :description "FIXME: write description"
  :url "http://example.com/FIXME"
  :license {:name "EPL-2.0 OR GPL-2.0-or-later WITH Classpath-exception-2.0"
            :url "https://www.eclipse.org/legal/epl-2.0/"}
  :dependencies [[org.clojure/clojure     "1.10.1"]
                 [ring/ring-core          "1.9.1"]
                 [ring/ring-jetty-adapter "1.9.1"]
                 [aleph                   "0.4.6"]
                 [compojure               "1.6.2"]]
  :repl-options {:init-ns web-dev.core})
Now start the REPL again.
In src/web-dev/core.clj, require two Compojure namespaces in your ns declaration.
(ns web-dev.core
  (:require [ring.adapter.jetty :as jetty]
            #_[aleph.http         :as aleph]
            [compojure.core     :as comp]
            [compojure.route    :as route]
            [clojure.pprint     :as pprint]))
Compile the file. Then start your server.
=> (start-server)
Routing with Compojure
Recall our app function, which has three routes and a catch-all "Not Found".
(defn app [req]
  (case (:uri req)
    "/" {:status 200
         :body "<h1>Homepage</h1>
                <ul>
                    <li><a href=\"/echo\">Echo request</a></li>
                    <li><a href=\"/greeting\">Greeting</a></li>
                </ul>"
         :headers {"Content-Type" "text/html; charset=UTF-8"}}
    "/echo" {:status 200
             :body (with-out-str (pprint/pprint req))
             :headers {"Content-Type" "text/plain"}}
    "/greeting" {:status 200
                 :body "Hello, World!"
                 :headers {"Content-Type" "text/plain"}}
    {:status 404
     :body "Not found."
     :headers {"Content-Type" "text/plain"}}))
These are easily expressed in Compojure. We'll do them one at a time.
To start, add a new comp/defroutes just after app's definition. Call it
app also, to shadow the existing defn. When two functions with the same name
are compiled, they are compiled in order. The second one will replace the first
one. By putting the Compojure definition of app after our function definition,
our server will use the Compojure one.
(comp/defroutes app)
Compile that and check it with curl:
curl -v localhost:3001
You'll notice that the response is 204 No Content. It's a success code
(because it's in the 2XX range). But there was nothing to show. Let's
investigate a bit.
In your REPL, call app to see what it does:
=> (app {})
nil
We use an empty map as the request because the request doesn't really matter. There are three things to learn:
- Compojure's
defroutesdefines a var whose value is a Ring handler. - With no routes defined in the
defroutes, the handler returnsnil. - Ring converts a
nilresponse into a204 No Contentresponse.
Note: If you visit the page in your browser, you might see something
different. My browser interpreted the 204 No Content response to mean "show
the last data in the cache for this URL." When in doubt, use curl to know the
details.
Let's add the first route.
Compojure uses a set of macros named after the HTTP methods. Since we intend to
respond to GET requests to / with the homepage, we start using the GET
macro. Then we copy-paste the response directly.
(comp/defroutes app
  (comp/GET "/" [] {:status 200
                    :body "<h1>Homepage</h1>
                           <ul>
                               <li><a href=\"/echo\">Echo request</a></li>
                               <li><a href=\"/greeting\">Greeting</a></li>
                           </ul>"
                    :headers {"Content-Type" "text/html; charset=UTF-8"}}))
Recompile and check it with curl:
curl localhost:3001
It should return the HTML.
Let's go through that GET macro call one step at a time.
The next route is also a GET request
(comp/GET "/" [] {:status 200 ... })
First is the macro name. Each of these macros matches a specific HTTP method.
This one matches only GET requests by checking the :method field in the
request. If it doesn't match, Compojure will move on to the next one. POST
matches POST requests, OPTIONS matches OPTIONS requests, etc. The only
exception is the ANY macro, which matches all request methods.
Because we're using GET, it won't work with POST requests like our old app
did. But that shouldn't matter since we won't be posting to it.
Next up is the path string, "/". That tells Compojure which path to match.
Some special directives help you match, such as wildcards. I'll leave that to
Compojure's
docs. We will
use some of that in part 2.
After that is an empty vector []. Those are the parameters we want to use from
the request. Since we don't need anything, we have an empty vector. Just like
with a function without arguments, you need that. You can read the Compojure
docs on it.
We will use them in part 2.
Finally comes the Ring response. We copy-pasted that from the old app.
Compojure treats different types differently. We used a map, which it interprets
as a Ring response which it augments with defaults if something is missing. If
you just put a string, it will create an HTML Ring response with that string as
the body. These are done for convenience. We will see other conveniences in part 2. Right now, we're just routing.
Let's add the next route. We'll copy-paste that response, too.
(comp/defroutes app
  (comp/GET "/" [] {:status 200
                    :body "<h1>Homepage</h1>
                           <ul>
                               <li><a href=\"/echo\">Echo request</a></li>
                               <li><a href=\"/greeting\">Greeting</a></li>
                           </ul>"
                    :headers {"Content-Type" "text/html; charset=UTF-8"}})
  (comp/ANY "/echo" req {:status 200
                         :body (with-out-str (pprint/pprint req))  ;; use the req binding
                         :headers {"Content-Type" "text/plain"}}))
The route has the same basic shape. There are two big differences:
- We are using the
ANYmacro because we want to be able to echo any request we send. - Instead of an empty vector for the params, we have the symbol
req. Compojure will bind a local variable by that name to the entire request map. The binding is local to that route.
Recompile and test it with curl, this time with a POST:
curl localhost:3001/echo -XPOST
It should echo back the POST request. You may notice that Compojure has added
its own stuff to the request map. You can do that, too. We'll see why and how
when we talk about middleware.
The next route is our /greeting:
(comp/defroutes app
  (comp/GET "/" [] {:status 200
                    :body "<h1>Homepage</h1>
                           <ul>
                               <li><a href=\"/echo\">Echo request</a></li>
                               <li><a href=\"/greeting\">Greeting</a></li>
                           </ul>"
                    :headers {"Content-Type" "text/html; charset=UTF-8"}})
  (comp/ANY "/echo" req {:status 200
                         :body (with-out-str (pprint/pprint req))
                         :headers {"Content-Type" "text/plain"}})
  (comp/GET "/greeting" [] {:status 200
                            :body "Hello, World!"
                            :headers {"Content-Type" "text/plain"}}))
This should be familiar.
The last thing is to add the default for pages that are not found:
(comp/defroutes app
  (comp/GET "/" [] {:status 200
                    :body "<h1>Homepage</h1>
                           <ul>
                               <li><a href=\"/echo\">Echo request</a></li>
                               <li><a href=\"/greeting\">Greeting</a></li>
                           </ul>"
                    :headers {"Content-Type" "text/html; charset=UTF-8"}})
  (comp/ANY "/echo" req {:status 200
                         :body (with-out-str (pprint/pprint req))
                         :headers {"Content-Type" "text/plain"}})
  (comp/GET "/greeting" [] {:status 200
                            :body "Hello, World!"
                            :headers {"Content-Type" "text/plain"}})
  (route/not-found {:status 404
                    :body "Not found."
                    :headers {"Content-Type" "text/plain"}}))
Compojure's route/not-found function responds with a 404 for all requests.
Since the routes are checked in order, we put this route last to match requests
that don't match any route.
That's about all we'll do with routes right now. Here are the takeaways:
- Routing means doing different things based on the path.
- Some routers also match based on the request method.
- Switching routers is easy. We shouldn't sweat choosing the right one now. We can always change later.
- We could implement routing ourselves. However, we would quickly find they are too complex.
Parsing the query string
We have a route at /greeting that says "Hello, World!". That's pretty boring.
It would be much cooler if we could customize the greeting. Let's make it so
that the greeting is based on a parameter.
Visit this in your browser:
http://localhost:3001/greeting?g=Yo
Notice that it still says "Hello, World!" The g=Yo part is ignored. Let's make
it return "Yo, World!" instead.
First, let's get a good look at the request. Visit /echo in your browser. It
should show you a big Clojure hash map. Look for the key called :query-string.
It will be nil. That's because that URL does not include a query string. The
query string is the part of the URL after the ?, which the URL /echo does
not have.
Now visit /echo?g=Yo and look at the :query-string key. This time it's
"g=Yo". Ring separates the raw query string from the URL and puts it at that
key for you.
Query strings are used as a way to pass data to the request separate from the path. For instance, submitting the search form on Google opens a page with a query string. If I search for "monkeys", I get directed to this URL:
https://www.google.com/search?q=monkeys
The URL has multiple parts. There's the protocol (https), the host
(www.google.com), the path (/search), and the query string q=monkeys. The
URL can also contain a port, username and password, and a hash.
A standard query string is a sequence of key-value pairs. Each pair is separated
by a & character. And the key is separated from the value by an = character.
Finally, the key and the value are URL-encoded, which means certain important
symbols are escaped in a special way.
Although it will separate the query string from the URL, Ring, by default, does not parse the string into key-value pairs.
We could write a function to parse it ourselves. In fact, that might be a good
exercise for you to do later. For now, imagine we had a function called
parse-query-string that parsed the string and returned a map with key-value
pairs. We could call it from the greeting route and construct the response from
it:
  (comp/GET "/greeting" [] (let [qs (parse-query-string (:query-string req))]
                             {:status 200
                              :body (str (:g qs) ", World!")
                              :headers {"Content-Type" "text/plain"}}))
That would work! And we'd be done!
But imagine a real application with lots of routes. Many of them would need to parse the query string. We would have to write the same code to parse it in many places. And it's not like this is some custom logic; it's a standard web thing to access those query strings. Parsing the query string is an example of a cross-cutting concern.
Parsing the query string is a cross-cutting concern because any handler might be interested in doing it. We'd like a standard way to do it, ideally written in one place, that solves the issue for all handlers.
Ring provides a mechanism for dealing with cross-cutting concerns called middleware. Middleware are functions that take a handler as an argument and return a new handler that is a modified version of the argument. Handlers are functions from request to response. Middleware are higher-order functions from handler to handler.
Installing query-string parsing middleware
Let's install a new middleware to handle the parsing of query strings for us. Luckily, Ring comes with one.
Require the middleware in the ns declaration:
[ring.middleware.params :refer [wrap-params]]
This means we will refer to the middleware by name without needing a namespace prefix.
Currently, we are connecting our routes (called app) directly to our web
server. Let's add another layer of indirection.
Rename app to routes:
(comp/defroutes routes
And make a new def for app that points to routes:
(def app routes)
app is going to be our middleware stack.
Recompile to make sure everything still works and test it in the browser.
Now that we're sure everything works, let's add in the middleware.
(def app (wrap-params routes))
Middleware typically start with the wrap- prefix. They wrap new behavior
around the existing behavior of the handler. We're always dealing with handlers.
Recompile app and visit /echo?g=Yo in your browser. Note three things: 1)
:query-string is still there and unparsed ("g=Yo); 2) There is a new key
called :query-params with the value {"g" "Yo"}; 3) The key :params also
contains "g" "Yo".
wrap-params essentially does this:
(defn wrap-params [handler]
  (fn [req]  ;; return a handler
    (let [query-params (parse-query-string (:query-string req))
          req' (-> req
                 (assoc  :query-params query-params)   ;; add :query-params key
                 (update :params merge query-params))] ;; add key-value pairs to :params
      (handler req'))))
Notice how the returned handler "wraps" the behavior of the handler argument. Middleware can:
- Modify the request before the handler gets it
- Modify the response the handler generates
- Choose not to call the handler
- Wrap the call to the handler in a try/catch to facilitate error reporting
- etc.
Middleware are very versatile.
Installing keyword middleware
Have a look again at the :query-params in the /echo?g=Yo response. Notice
that the key is a string. It would be more convenient if that were a keyword
instead. There is middleware for that.
Add the requirement to the ns declaration:
[ring.middleware.keyword-params :refer [wrap-keyword-params]]
wrap-keyword-params has the same wrap- prefix we saw in the other
middleware. This one changes any string keys into keywords in the :params map.
Let's add it to the middleware stack like this:
(def app (wrap-keyword-params (wrap-params routes)))
Recompile app and check it in your browser. Has it changed anything?
It did not change mine. Why? Because the middleware are installed in the wrong
order. wrap-keyword-params is wrapping the result of wrap-params called with
routes. This is essentially what it results in:
(fn [req]
  (let [req' (update req :params clojure.walk/keywordize-keys)] ;; wrap-keyword-params
    (let [query-params (parse-query-string (:query-string req)) ;; wrap-params
          req' (-> req
                 (assoc  :query-params query-params)   ;; add :query-params key
                 (update :params merge query-params))] ;; add key-value pairs to :params
      (handler req'))))
We keywordize keys before we parse the query params. We need to do it the other way around.
(def app (wrap-params (wrap-keyword-params routes)))
Recompile and notice that the map under :params has keywords for keys. The
lesson is that the order of middleware is sometimes important.
Commonly, middleware are very granular. Each one does a tiny job. You can then
compose a bigger job by composing middleware (in the right order). We also see
the usefulness of the /echo endpoint: It shows us the request after it goes
through all of the middleware.
You should peruse the existing middleware in the ring.middleware.* namespaces
if you're interested in other things you can do with middleware. They are quite
versatile.
Using the threading macro in your middleware stack
The middleware stack can get quite high as you add more and more middleware. Most programmers use the threading macro to make the stack vertical instead of horizontal. This is what our current stack looks like using the threading macro:
(def app
  (-> routes
      wrap-keyword-params
      wrap-params))
This is equivalent to the other form. But it's vertical so as it grows, it won't wrap on a line.
I sometimes find this hard to read because it is upside down. First, the params are parsed. Then they're turned into keywords. Then the handler is called. It was difficult for me at first but I quickly learned it.
Make recompiling easier by wrapping the routes
Recompile everything and load the homepage (/) in the browser.
Now make a change to the homepage HTML. Change "Homepage" to "My Site" in the
<h1>. Recompile just the routes and reload the browser.
It should still say "Homepage". Why?
Well, this is the same problem we had when we were passing app directly to the
server. In our middleware stack, we are passing the value of routes at the
time app gets compiled and run. Later, when we recompile routes, app still
points to the old function. We need to indirect it similar to how we do it in
the server. Here's the code to start the server:
(defn start-server []
  (reset! server
          (jetty/run-jetty (fn [req] (app req)) ;; we pass in a function that calls app
                           {:port 3001
                            :join? false})))
We pass in a function that calls app. That function will look up the current
value of app each time it is run. We can do the same for routes:
(def app
  (-> (fn [req] (routes req))
      wrap-keyword-params
      wrap-params))
Recompile everything. Load it in the browser. Now make a change to routes
(change the <h1> back to "Homepage"), recompile it, and reload the browser. It
should work this time.
Concluding part 1
We have created a little web app! It doesn't do much, but believe it or not, it's how I always start my web projects. It's got a web server, routing, parameter parsing, and some basic routes set up. It is easy to work with at the REPL. Anything I recompile will immediately show in the browser.
Summary
- Ring converts HTTP requests to a standard map format and it converts standard response maps into HTTP responses. This makes it easy to write your logic in Clojure.
- Ring defines three parts: Adapters, Handlers, and Middleware. You build an application out of these parts.
- Adapters use JVM web servers to respond to requests. Their job is to translate between HTTP and Ring maps.
- Handlers accept a Ring request and return Ring responses. They do the main work of your server.
- Middleware add functionality to your handlers to take care of cross-cutting concerns. They are typically written to handle common HTTP tasks. You typically build a stack of middleware.
- Routing means doing different things based on the URL path. We used Compojure to route our application.
Up next
I'm currently working on part 2. In it, we will build a full-blown photo-sharing application.
Build your backend in Clojure!
Invest in yourself with my Clojure Web Backend Signature Course.
- 2 web backend modules
- 6 detailed lessons
- 1.9 hours of video