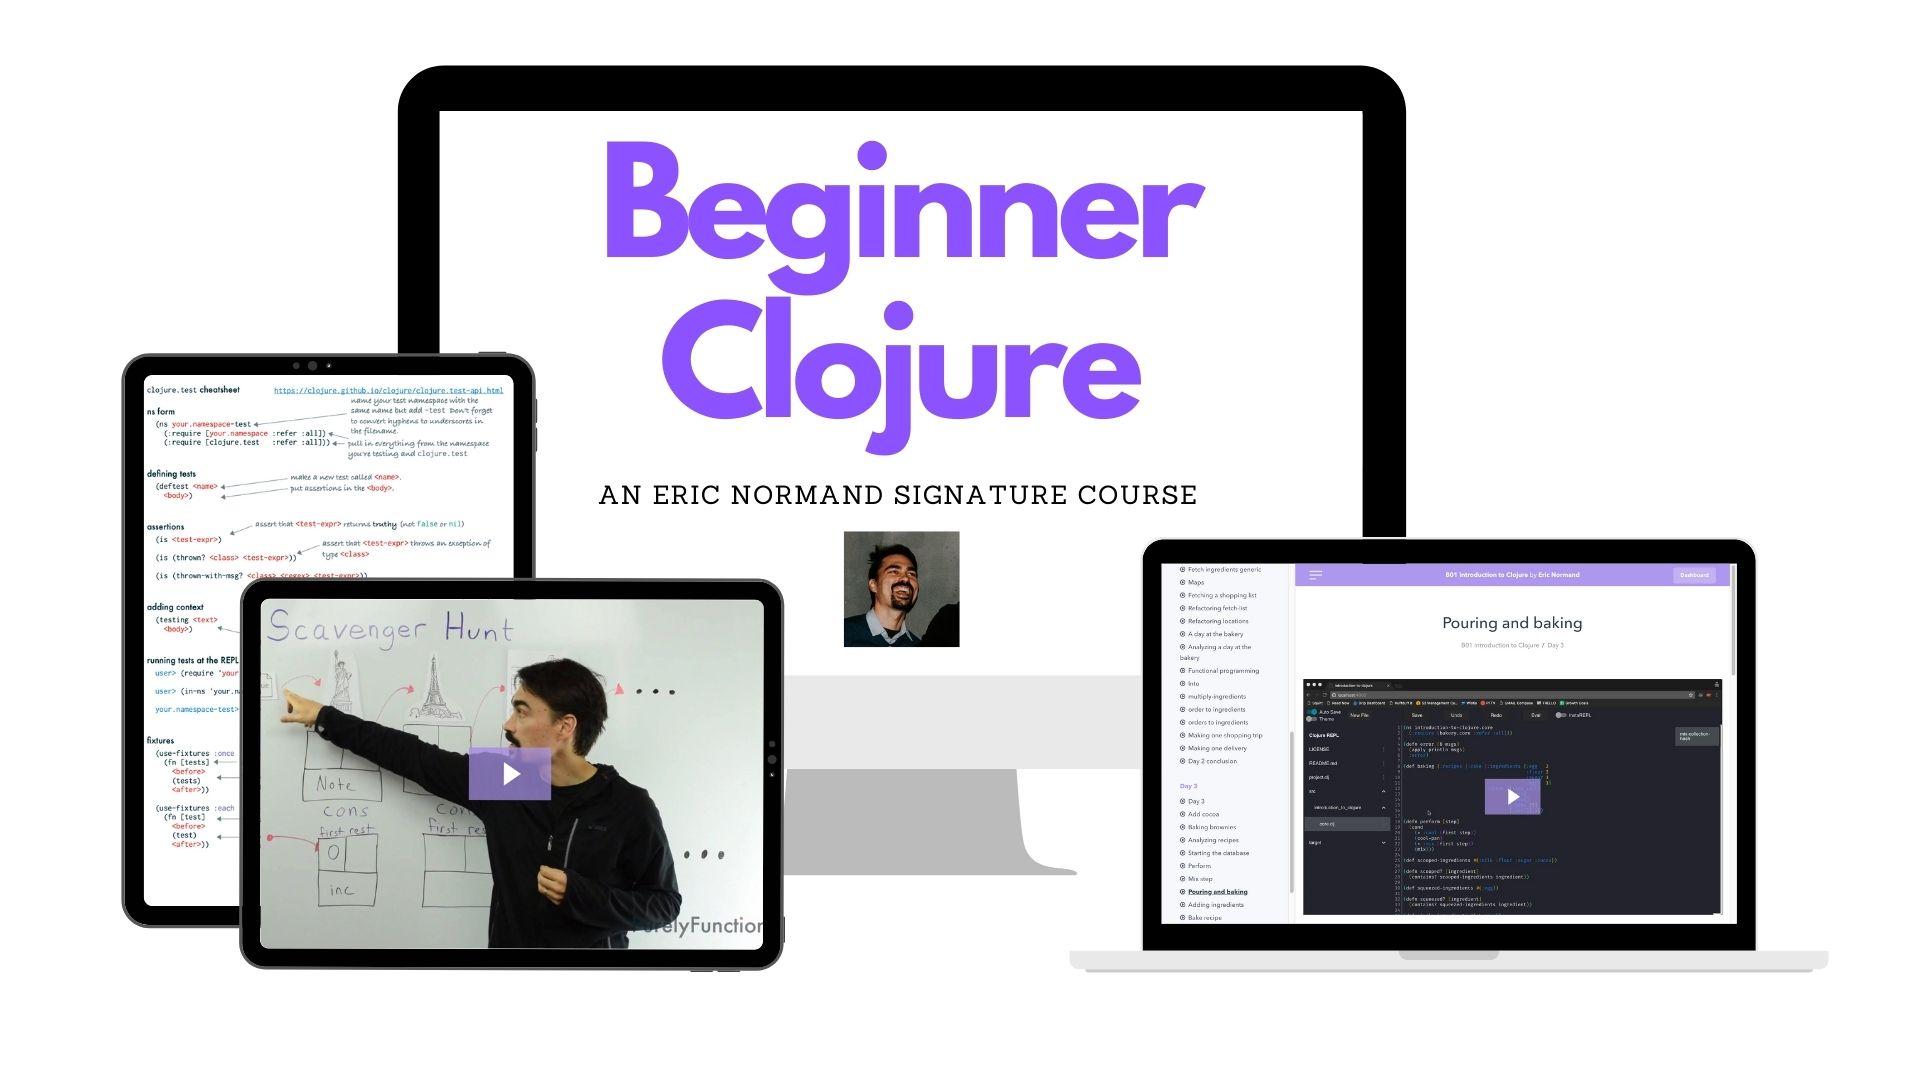
Clojure Tutorial
Want the best way to learn Clojure?
Invest in yourself with my Beginner Clojure Signature Course.
- 8 fundamental modules
- 240 fun lessons
- 42 hours of video
Summary: Learn Clojure syntax, set up a development environment, then build a fun project.
Introduction
Want to learn Clojure? Well, this is the place for you!
Objectives
- Master the syntax of Clojure.
- Install everything you need to develop in Clojure.
- Write code using the REPL.
- Build a fun app in Clojure.
Learning Clojure can be challenging. It has different syntax (lots of parentheses), a different development model (REPL-Driven Development), and is mainly functional, which may be a new paradigm to you.
However, people who make it through say all of the work is worth it. Learning Clojure has changed how I program for the better, regardless of the language I'm using.
I've tried to make this as fun, smooth, and complete as possible. So let's get started!
Table of Contents
- Introduction
- Quick intro: What is Clojure?
- Fizzbuzz: An existing project
- Phrase-o-tron: An existing project
- Setting up a Clojure Dev environment
- 99 Bottles of Beer
- Setting up a Clojure Dev environment
- Rock, Paper, Scissors: A complete project
- Create a Clojure project
- Create a Clojure source file
- Jack-in to the REPL
- Print our first message
- Creating a main function
- Rich comment form
- Prompting for input and reading
- Branching
- Looping
- Playing the game
- Interpreting the input
- Playing a round
- Printing the result
- Maintaining state
- Printing the state of the game
- Review
- Next steps
Quick intro: What is Clojure?
Clojure is a functional programming language. It runs on the Java Virtual Machine (JVM). It has a different syntax from what you may be used to, but the syntax is simple. Most people pick it up quickly.
People use Clojure for any number of applications, from web development (backend and frontend), to machine learning, to financial services. It shines in multi-threaded programming, data processing, and exploratory programming, among many other strengths. It's used at some of the largest companies in the world and across all industries.
Fizzbuzz: An existing project
Fizzbuzz is a simple program often used to weed out people from interviews who can't manage a loop and a conditional. For us, it will be a great demonstration of how to loop and branch in Clojure.
In Fizzbuzz, we need to print out the numbers from 1 to 100, but if it's divisible by 3, we print Fizz, if it's divisible by 5, we print Buzz, and if it's divisible by both 3 and 5, we print FizzBuzz.
Here's some code. There's one problem in it, but we'll fix that in a minute. But first, let's understand it line-by-line.
(ns fizz-buzz.core)

(defn -main [& args]
  (dotimes [n 100]
    (cond
      (and (zero? (rem n 3))
           (zero? (rem n 5)))
      (println "FizzBuzz")

      (zero? (rem n 3))
      (println "Fizz")

      (zero? (rem n 5))
      (println "Buzz")

      :else
      (println n))))
Let's go through each line.
(ns fizz-buzz.core)
ns defines a namespace
Namespaces have two or more segments, separated by . In this case, we have the
segments fizz-buzz and core. core is a common namespace final segment.
The next line defines a function:
(defn -main [& args]
(dotimes [n 100]
(cond
Here's the first branch:
(and (zero? (rem n 3))
     (zero? (rem n 5)))
(println "FizzBuzz")
(rem n 3)
rem returns the remainder of a division
(zero? (rem n 3))
We then pass that return value (the remainder) to zero? which returns true
if its argument is equal to zero. If the remainder is zero, it means the number
is divisible by 3.
We see the same for 5:
(zero? (rem n 5))
Then we combine them with and:
(and (zero? (rem n 3))
     (zero? (rem n 5)))
and does a logical AND operation. It returns true if both of its arguments are true.
Finally, the expression gets executed if the test is true:
(println "FizzBuzz")
The second branch prints "Fizz" if n is divisible by 3.
      (zero? (rem n 3))
      (println "Fizz")
The third branch prints "Buzz" if n is divisible by 5.
      (zero? (rem n 5))
      (println "Buzz")
The final branch is different.
      :else
      (println n)
The expressions of this branch simply prints the number as is.
If we run it, though, we get this output:
FizzBuzz
1
2
Fizz
4
Buzz
Fizz
7
8
Fizz
Buzz
...
The first thing printed is FizzBuzz, followed by 1. What's happening? The loop starts at 0 instead of 1. Likewise, the end of the output is 99 when it should be 100.
How can we fix that? Unfortunately, this is the behavior of dotimes. dotimes
is still a great tool for this, but we have to add 1 to n. We can add in a
local variable to store n+1.
(ns fizz-buzz.core)

(defn -main [& args]
  (dotimes [n 100]
    (let [n (inc n)] ;; bind a local n to n+1
      (cond
        (and (zero? (rem n 3))
          (zero? (rem n 5)))
        (println "FizzBuzz")

        (zero? (rem n 3))
        (println "Fizz")

        (zero? (rem n 5))
        (println "Buzz")

        :else
        (println n))))
  (dotimes [n 100]
    (let [n (inc n)]
      (cond
Some people will wonder what is going on since we have two variables called n,
one bound by the dotimes and one by the let. That's a good point and I
should explain.
First of all, there are two different variables with the same name. It's not the
same variable being assigned to twice. Each variable has a scope (which means
the area of the code over which the variable is defined). In this case, the n
from dotimes has a slightly bigger scope since the let is inside the
dotimes.
And that's it! That's a Clojure implementation of FizzBuzz.
Phrase-o-tron: An existing project
Speaking of buzz, here's a neat little program that can generate new buzzword-compatible business ideas.
(ns phrase-o-tron.core)

(def adjectives  ["web-scale" "streaming" "distributed" "mobile-first" "turn-key" "climate-friendly"])
(def services    ["sneezing" "laundry" "napping" "chewing" "socializing"])
(def descriptors ["on the blockchain" "using AI" "in the cloud" "for the metaverse" "as a service"])

(defn -main [& args]
  (let [adj (rand-nth adjectives)
        srv (rand-nth services)
        des (rand-nth descriptors)]
    (println adj srv des)))
It outputs lines like this:
climate-friendly chewing for the metaverse
web-scale laundry on the blockchain
Let's go through it line-by-line.
(ns phrase-o-tron.core)
First, we define a namespace called phrase-o-tron.core. Everything defined
after this line will be defined in the namespace.
(def adjectives ["web-scale" "streaming" "distributed" "mobile-first" "turn-key" "climate-friendly"])
(def services    ["sneezing" "laundry" "napping" "chewing" "socializing"])
(def descriptors ["on the blockchain" "using AI" "in the cloud" "for the metaverse" "as a service"])
We define two more vars, services and descriptors, with two more vectors of
strings.
(defn -main [& args] ;; args will be a sequence of command-line arguments
Again, the -main function is the entry point into a Clojure program. This will
be passed the command-line arguments.
(let [adj (rand-nth adjectives)
      srv (rand-nth services)
      des (rand-nth descriptors)]
(println adj src des)
We print the three strings out, with spaces between them. It should output one line each time it runs. The lines should look something like this:
climate-friendly chewing for the metaverse
web-scale laundry on the blockchain
web-scale socializing in the cloud
99 Bottles of Beer
Here's a neat program that prints the lyrics for the song 99 Bottles of Beer. You have all the tools you need to understand this code. Step through each line to see what it does.
(ns bottles-99.core)

(defn -main [& args]
  (dotimes [iteration 99]
    (let [iteration (- 99 iteration)
          next-iteration (- iteration 1)
          word (if (> iteration 1) "bottles" "bottle")
          word2 (if (> next-iteration 1) "bottles" "bottle")]
      (println iteration word "of beer on the wall,")
      (println iteration word "of beer.")
      (println "Take one down.")
      (println "Pass it around.")
      (if (> next-iteration 0)
        (println next-iteration word2 "of beer on the wall.")
        (println "No more bottles of beer on the wall."))
      (println))))
Setting up a Clojure Dev environment
We're going to build an app from scratch, but first, we need to get our development environment set up. We're going to set up the basic tools you need plus an IDE. In theory, you can use whatever IDE you feel comfortable with, but I've chosen VS Code with Calva because it is very popular and has an easy setup. All of the screenshots and keystrokes will use Calva.
For this tutorial, you will need four things:
- Java Development Kit (JDK) which includes the JVM and libraries.
- Clojure command line interface (CLI) which runs Clojure.
- Visual Studio Code (VS Code), an open-source code editor.
- Calva, a plugin for VS Code that supports Clojure development.
I have a guide for installing Clojure that covers the three major platforms (Windows, MacOS, and Linux). That guide goes way more in depth and detail. If you have trouble with the installation in this tutorial, check out that guide.
Install Java Development Kit
Download and install the latest OpenJDK LTS (long-term service) release from Adoptium.
Install the Clojure CLI
This step depends on what kind of system you are working on. Choose your system and follow the instructions.
Windows
Open a PowerShell terminal.
- Install Scoop (click here).
- Install dependencies
scoop install git ## if you don't have it already
scoop bucket add extras
- Add the Clojure repository
scoop bucket add scoop-clojure https://github.com/littleli/scoop-clojure
- Install Clojure CLI
scoop install clj-deps
MacOS
Open a Terminal window.
- Install Brew (click here) if you don't have it.
- Install Clojure
brew install clojure/tools/clojure
Linux
- Install dependencies.
sudo apt-get install -y bash curl rlwrap
- Download the install script.
curl -L -O https://github.com/clojure/brew-install/releases/latest/download/linux-install.sh
- Add execute permissions to the install script.
chmod +x linux-install.sh
- Execute the install script.
sudo ./linux-install.sh
Install Visual Studio Code
If you already have VS Code, you can skip this step.
First, get the latest version of VS Code for your system on the VS Code download page.
On Windows, it is an executable installer. Run it.
On Mac, it is a zip file containing the executable. Uncrompress the zip file then drag the application to your Applications folder.
On Linux, install the appropriate package as is typically done on your system. For instance, for Ubuntu, download the DEB file and double-click it.
Install Calva
Calva is a plugin for VS Code for editing and running Clojure code.
To install, first open VS Code. On the left there will be various icons. Click the Plugins icon.

In the search box, type "Calva". The Calva plugin should be near the top of the list. Its icon looks like this:

Click the little blue "install" button and follow the directions.
Update Calva settings
Calva comes with a great setup by default. However, there is one setting that will be difficult for beginners that we will want to turn off—Paredit.
Paredit is a code-editing mode for doing what is called structured editing. Structured editing is a style of code editing where parentheses are always balanced. That means you can't just add and remove parentheses at any time. Instead, there are commands for expanding and collapsing balanced sets of parentheses and other operations that always maintain open and close parens. I use Paredit, but I don't think it's a good idea to learn those commands at the same time as you are learning an editor and a programming language. So let's turn them off.
Go back to the plugins panel in VS Code, search for Calva, and click the little gear icon next to it. Click that and in the menu that pops up, click "Extension Settings".
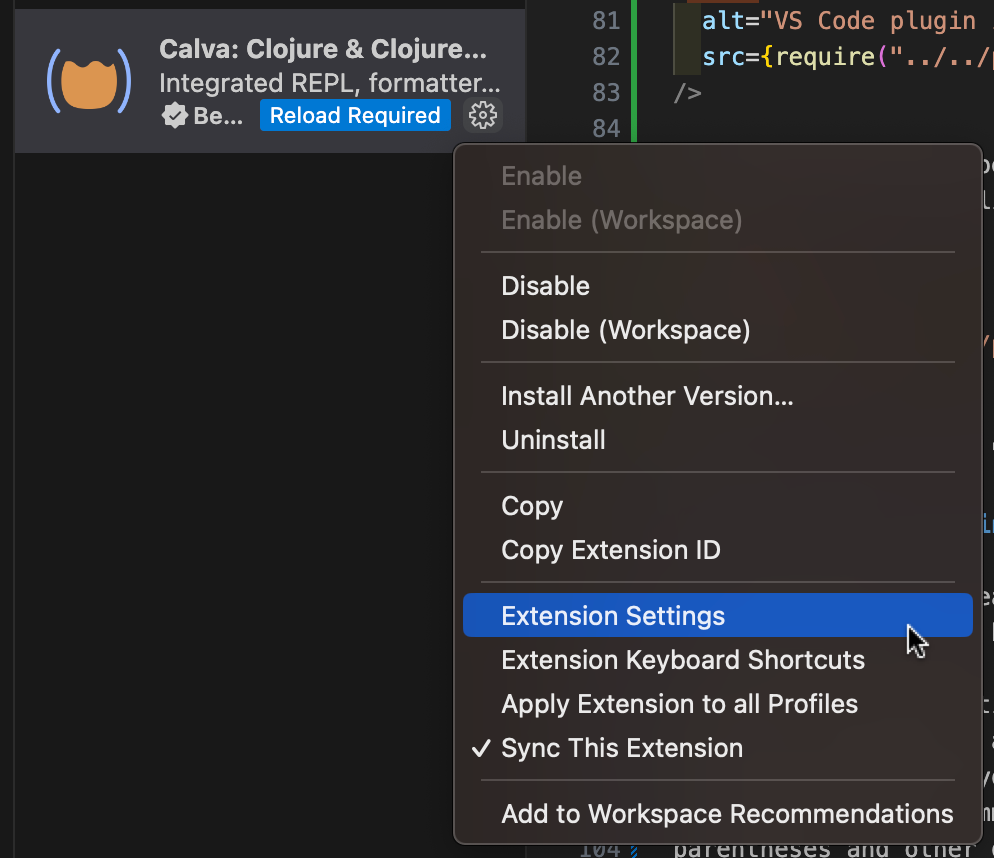
That will open up the settings page. Along the left, there's a section called "Paredit". Click that. There are two settings you need to change.
- Set "Default Key Map" to "none".
- Uncheck "Hijack VSCode Defaults".
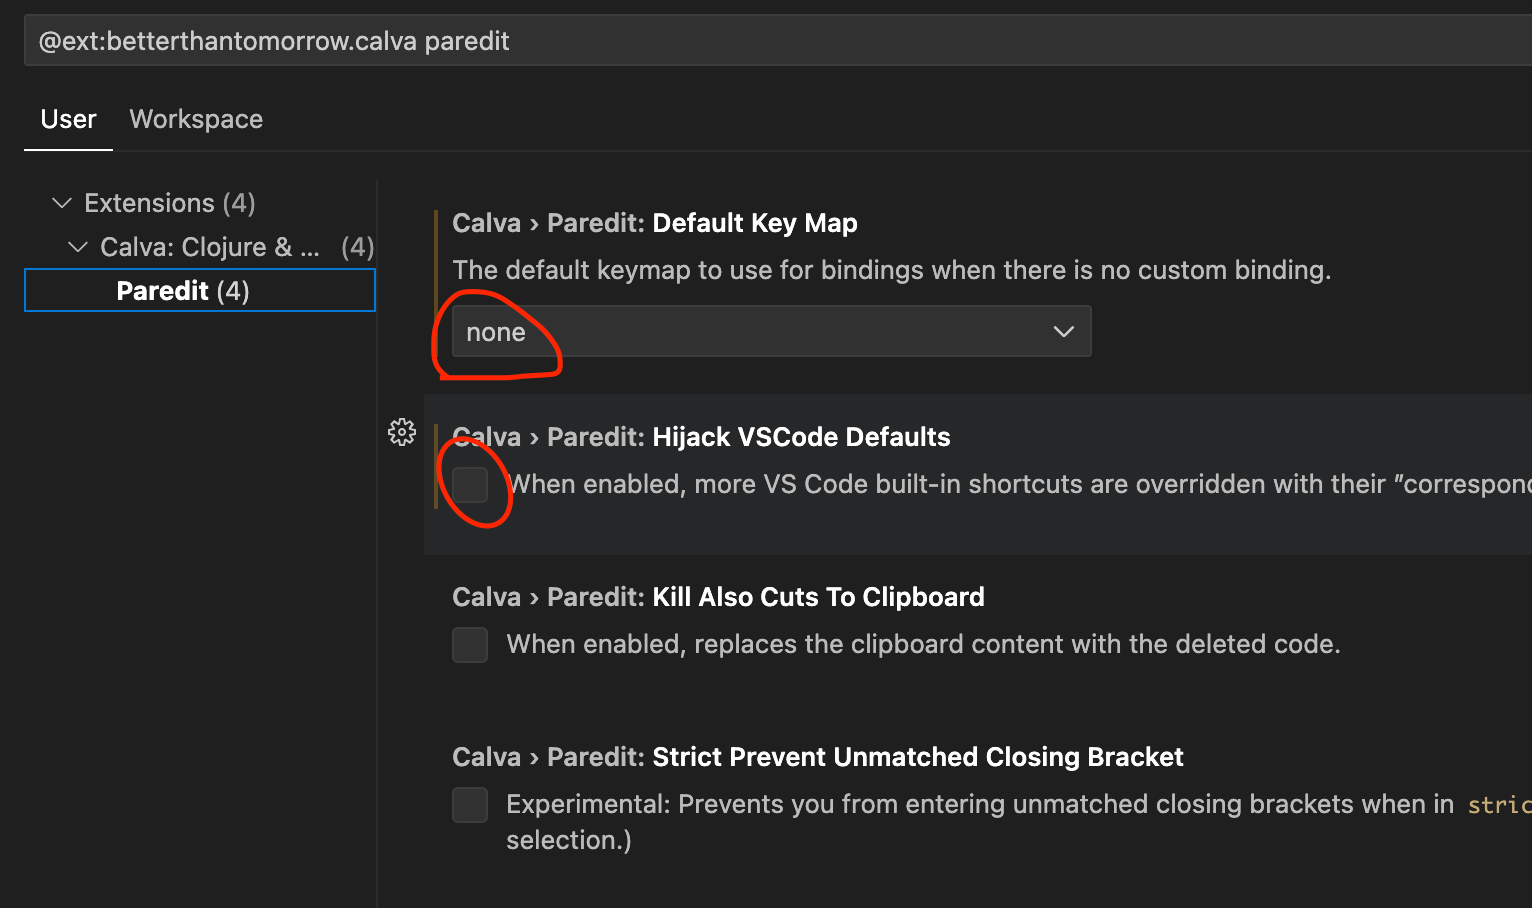
After setting those, you can close the settings tab.
Rock, Paper, Scissors: A complete project
Our first project is going to be a simple game: Rock, Paper, Scissors. In this game, the player will play against the computer. The computer will choose a random move, and the player will also choose a move. Then the game will print out the result and keep score.
We'll take it slow and build up the skills we need to write this game, including learning the syntax, managing input and output, and writing logic.
Let's get started.
Create a Clojure project
Let's create a new Clojure project in VS Code.
First, open the File > Open Folder... option in the menu.
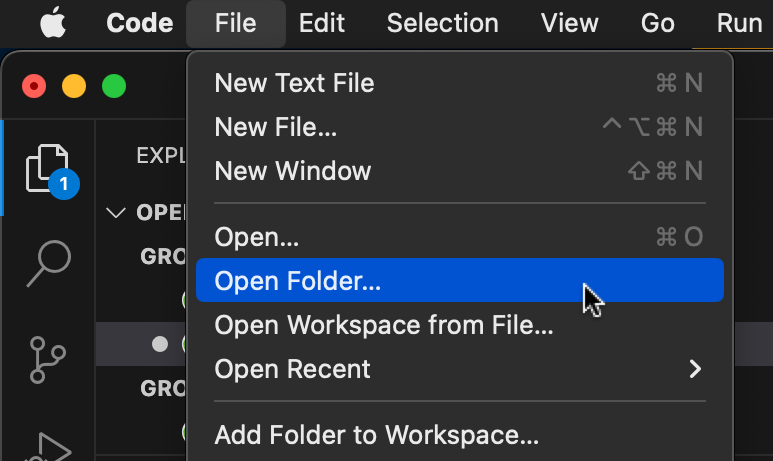
That will open a modal box. Navigate to the folder you want to put the new project in. The new project will be in a subfolder.
I keep my coding projects in a folder called projects. You can put it wherever
you want.

Once inside your project folder, create a new folder by clicking the button at
the bottom of the modal. Name it rock-paper-scissors.
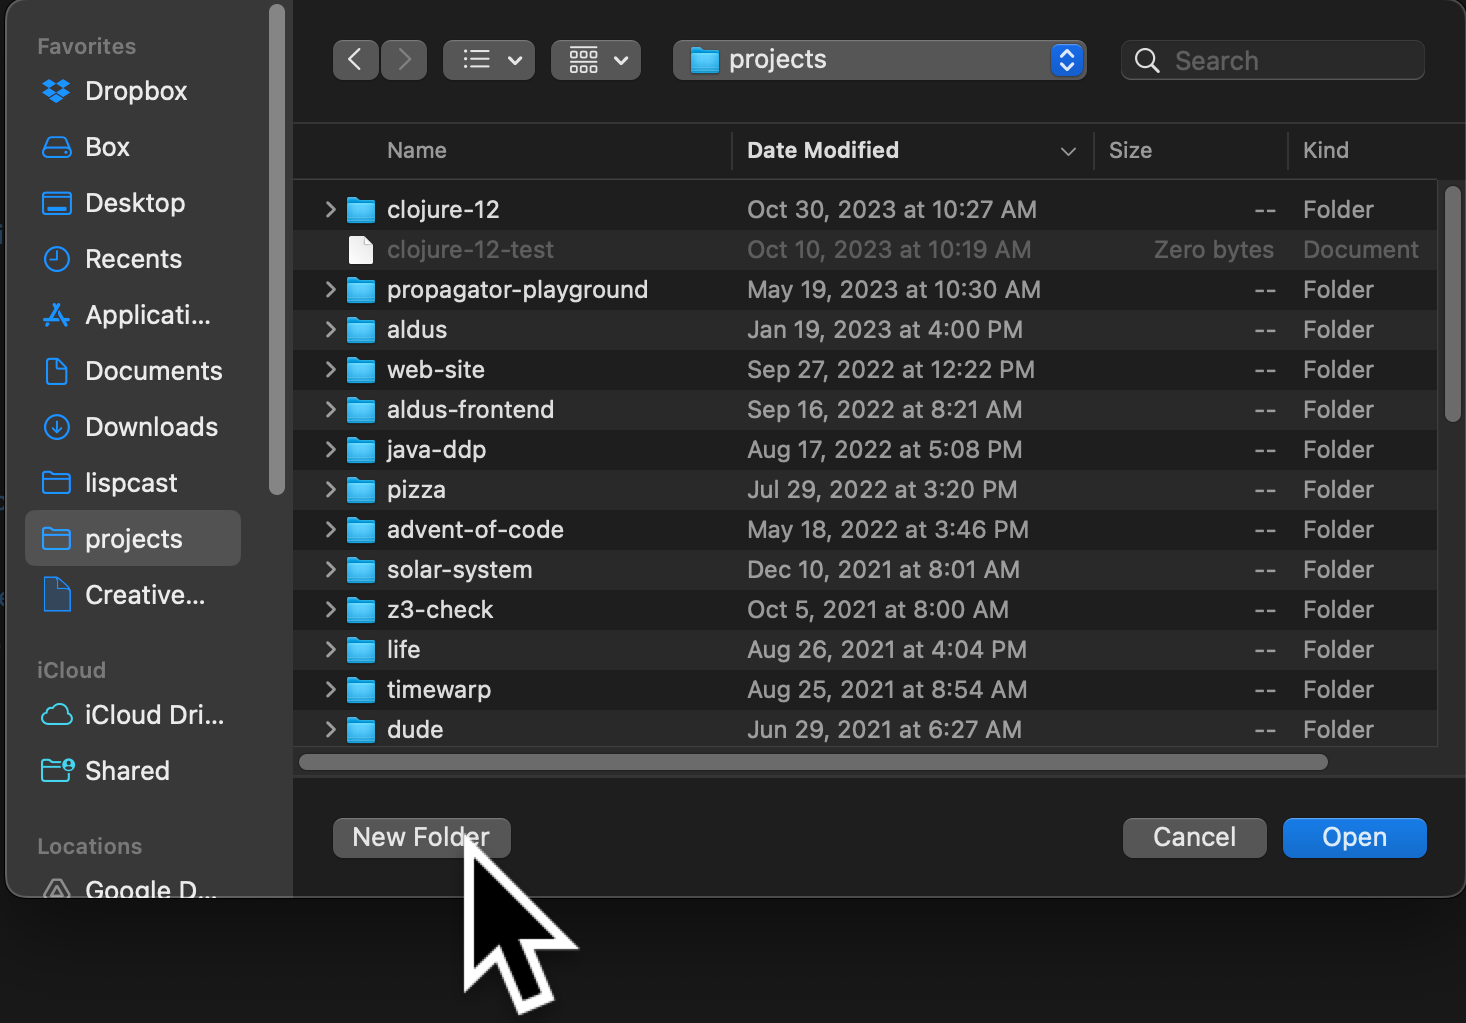
Then click the Open button at the bottom right.

Now VS Code has an empty folder open. To make it a Clojure project, we need one
file called deps.edn. Create a new file using the new file icon. Then name it
deps.edn.

Once you have a deps.edn file, you'll notice that Calva detects it and starts.
There's just one more thing we need to do.
Save deps.edn. Now you've got a working Clojure project and Clojure IDE.
Create a Clojure source file
But our project doesn't do anything! Let's make a Clojure code file that we can fill with code.
We need to create an src directory to hold our source files. Click the New Folder icon.
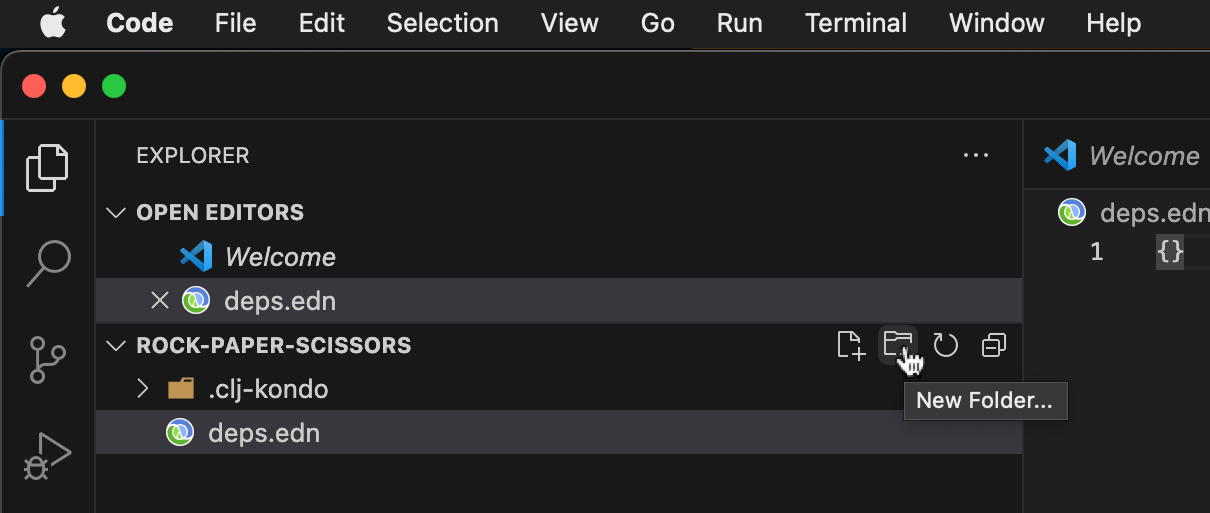
Call it src.
Inside that folder, create a new folder called rock_paper_scissors. Be sure to
use underscores. I'll talk about why shortly.
Finally, inside the new rock_paper_scissors folder, create a new file called
core.clj.
VS Code will open that file. Calva adds a single line up at the top. This line
is called the namespace declaration (or ns declaration for short).
(ns rock-paper-scissors.game)
(If it doesn't create the namespace declaration, it could be that the Clojure LSP failed to load. Close the folder and open it again. And add the above line of code yourself.)
It defines a new Clojure namespace. Namespaces typically correspond to Clojure source files. They let you organize your code.
This namespace is called rock-paper-scissors.game. Clojure namespaces need at
least two segments, separated by periods (.). It's a typical pattern to see
the first segment name the project, and the main namespace being called game.
As your project gets bigger, you add new namespaces as siblings to game. For
instance, a namespace rock-paper-scissors.util would be in a file util.clj
in the same folder as game.clj.
This namespace corresponds to the file src/rock_paper_scissors/game.clj.
Underscores are converted to hyphens (because hyphens are not universally
allowed in folder names), and slashes are converted to periods. Because the
namespace corresponds to a file on disk, the editor (VS Code with Calva) knew
how to generate the ns declaration. There's more to it, but that will give you
an overview for now.
Jack-in to the REPL
Clojure programmers tend to use the REPL. The REPL stands for "Read Eval Print Loop". When we use the REPL, our IDE is connected directly to a live, running program, and we frequently update the running program (as our code changes) and run little snippets of code to test the system.
Calva comes with a command to start an instance of Clojure and connect to a REPL
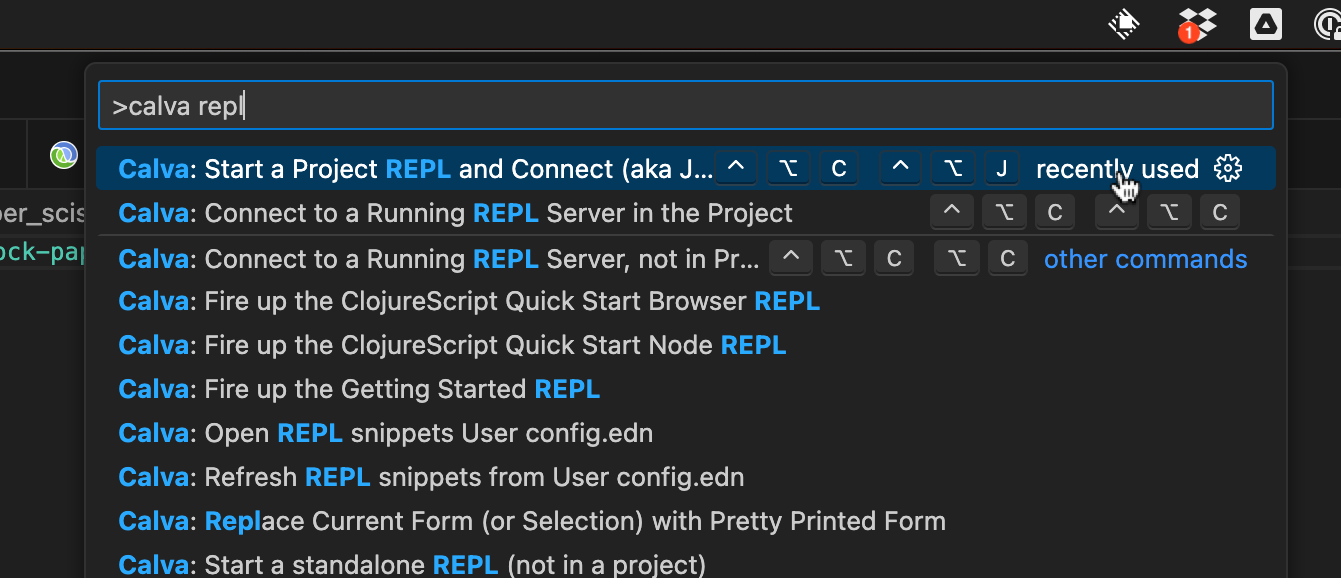
in it. Open up the VS Code command palette by hitting Command-Shift P (or
Control-Shift P on Windows). Type "calva repl" to filter the list of commands.
Select "Calva: Start a Project REPL and Connect" from the list.
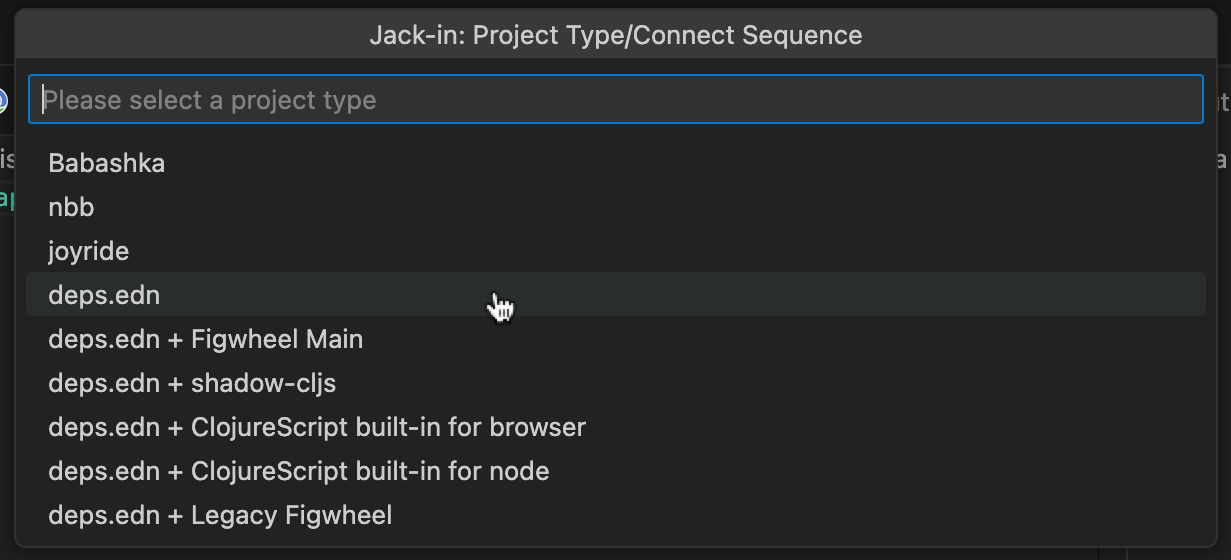
It will ask you what type of project to use. Click deps.edn.
This will open the REPL in a window on the right side of the editor.
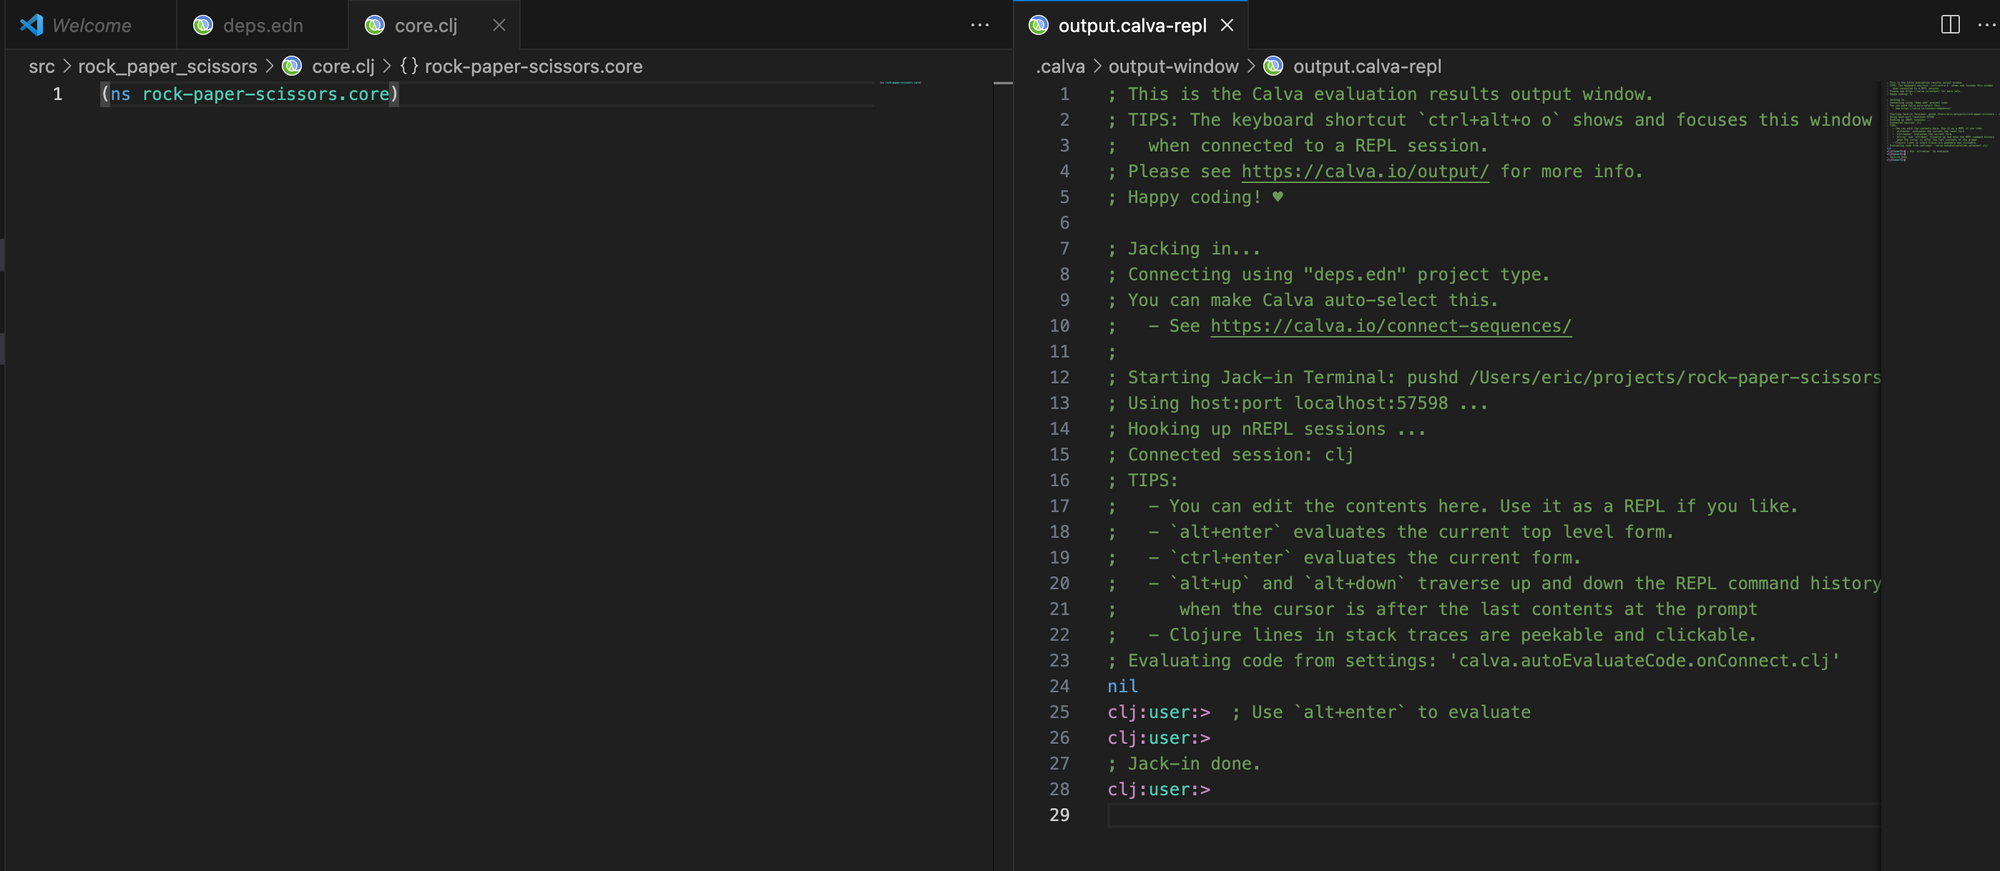
This is where the output of any code we evaluate will go. And we can also run code directly at the prompt.
Just for fun, let's test the REPL. After the prompt (clj:user:>) type the following:
(+ 100 100)
Close the paren (or move the cursor to after the closing paren) and hit enter.
It should print the answer (200) and then present a new prompt.
clj:user:=> (+ 100 100)
200
clj:user:=>
Print our first message
Let's make our code do something. Type this into game.cj.
(println "Welcome to the Rock, Paper, Scissors championship!")
Loading the file passes it through the Clojure compiler, then runs it. If we look in the REPL window, we see three things.
- The welcome string was printed out.
nilwas also printed.- The prompt changed from
clj:user>toclj:rock-paper-scissors.game:>.
clj:user:=>
Welcome to the Rock, Paper, Scissors championship!
nil
clj:rock-paper-scissors.game:=>
Finally, the prompt changed because loading the file loaded the namespace. Calva is smart enough to move the REPL to the namespace of the current file.
Creating a main function
This is a good first step, but we don't want the message to load every time we
load the file. We only want it to run when we intend to run the program. Clojure
makes a distinction between loading the file and running the -main function of
the file.
Let's define a -main function. The -main function is what is called when you
run a program.
Add this code to your game.clj:
(defn -main [& args]
  )
This is an empty function. Let's load the file. (Alt-Control-c Enter).
Notice the string was printed out again in the REPL. But this time, it didn't
print nil. Instead, the REPL prints #'rock-paper-scissors.game/-main. We
don't need to go into that too much, just remember that loading the file prints
out the result of the last line of code. The last line of code defines the
function -main.
We can call our function now, but it doesn't do anything! Let's make it do something.
Move the println call into the -main function.
Here's what your file should look like:
(ns rock-paper-scissors.game)

(defn -main [& args]
  (println "Welcome to the Rock, Paper, Scissors championship!"))
Now load the file (Alt-Control-c Enter).
Now it doesn't print the string when the file is loaded!
Rich comment form
At the end of the file, type the following:
(comment
  (-main)
  )
- The forms in your file that are not nested.
- The forms inside of a rich comment form that are not nested further.
When you run Alt-Enter inside of a rich comment form, Calva will execute the
form where your cursor is. In this case, it ran -main, which printed the
welcome message!
We now have a convenient way to run our game.
Prompting for input and reading
Add the following to the end of the -main function:
(println "Ready to play? Type y, n, or q to quit.")
If you run -main now, it won't print this new message, even after you save the
file. Try it. Move your cursor to the (-main) inside the rich comment form
and hit Alt-Enter.
Calva does not keep your code up-to-date in the REPL. You have to do it manually. It is a bit inconvenient, but I've learned to appreciate the control it gives me. It's definitely worth learning the keystrokes for loading files and executing top-level forms.
Let's compile the function. You can either load the whole file (Alt-Control-c Enter) or move your cursor to the definition of -main and evaluate the
top-level form (Alt-Enter).
Right now, the program just prints and then ends. Let's make it read input from the user.
Add the following line to the end of the -main function:
(read-line)
Then recompile and re-run it.
You should see the same message printed in the REPL. But something else happened that may be hard to see. VS Code has this sneaky little input box that pops up at the top center of the screen. I didn't see it at first. Someone needed to point it out to me. It's black on black. So I'm pointing it out to you to save you some time and frustration. Don't worry, when we're running it at the command line (not in VS Code), it will print and read in the same terminal window.
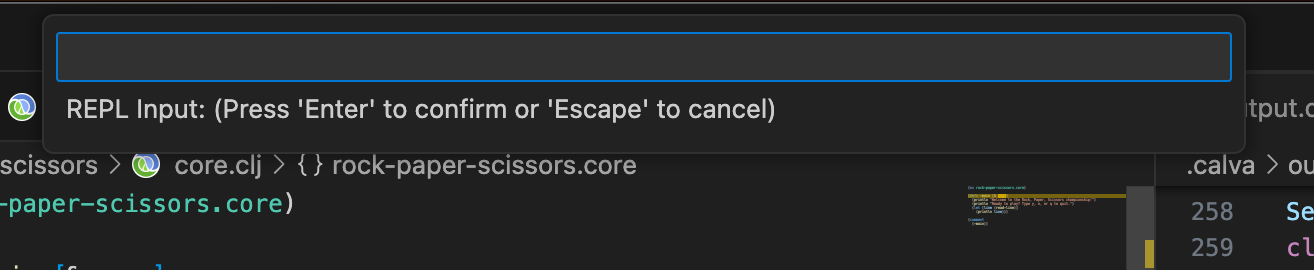
Find the box at the top and type in "hello" then hit enter. You should see the same string printed to the REPL. Notice that it has quotes.
Why does it print to the REPL? Remember, the P in REPL stands for "print" it prints out the value of the expression you executed.
You executed (-main), which calls the function called -main, which is defined like this:
(defn -main [& args]
  (println "Welcome to the Rock, Paper, Scissors championship!")
  (println "Ready to play? Type y, n, or q to quit.")
  (read-line)) ;; the last line of the function
We don't want to return the value read from the box. We want to do something with it. Let's save it in a local variable.
Change the call to read-line to look like this:
(let [line (read-line)]
  line)
Now compile and run.
You should get the same behavior as before. However, now we introduce a local
variable called line. This is called a let form, which lets you bind names
to values. In this case, we're calling read-line and binding the return value
to the name list. We can now refer to the local variable list anywhere after
it is defined within the let, up until the closing paren that matches the
opening paren of the let expression.
;; v-- this paren opens the let
   (let [line (read-line)] ;; <-- the closing square brace starts the body
     line) ;; <-- this paren closes the let
Branching
Let's do something with the local variable.
We want to branch on the three options we want to present. Let's take a small
step, creating a single if expression:
(let [line (read-line)]
  (if (= "y" line)
    (println "Let's start the game!")
    (println "I don't understand your input (yet)")))
Compile and run. Type "y" in the box, then hit enter. You should see our "Let's start the game!" message printed out.
Run it again and enter "n" in the box. It should print the "I don't understand your input (yet)" message.
Let's break down what is happening.
(let [line (read-line)] ;; read input and save to `line`
  (if (= "y" line) ;; compare `line` to "y" with = (pronounced equal)
    (println "Let's start the game!") ;; if they're equal, print this
    (println "I don't understand your input (yet)"))) ;; else, print this
That was a really small step. Let's see if we can do all the branches in one go.
I count four ("y", "n", "q", and unknown):
(let [line (read-line)]
  (if (= "y" line)
    (println "Let's start the game!")
    (if (= "n" line)
      (println "You're not ready? Then I'll wait.")
      (if (= "q" line)
        (println "See you next time!")
        (println "I don't understand your input. Please try again.")))))
Compile it. Now, play with it. You should be able to get each of the four messages, depending on what you enter in the box. Congrats!
Here's the thing: Clojure programmers don't want to nest so deeply. When we see
nested ifs like this, we want to change it to something flatter. There are
several options. For this tutorial, we will choose cond, but you might also
want to explore
case
(for when you want to compare equality to literals) and
condp
(for when the predicates are all the same; in this case they're all =).
We're choosing cond because it's general-purpose and more useful to learn. And
it does the job just fine.
Here's the nested if written as a cond:
(let [line (read-line)]
  (cond
    (= "y" line)                       ;; test
    (println "Let's start the game!")  ;; expression

    (= "n" line)                                  ;; test
    (println "You're not ready? Then I'll wait.") ;; expression

    (= "q" line)                   ;; test
    (println "See you next time!") ;; expression

    :else                                        ;; test
    (println "I don't understand your input."))) ;; expression
It's much flatter (a single level of indentation).
Let's talk about cond a moment. A cond is a conditional that can have
unlimited branches. It is a bunch of pairs. The first part of the pair is the
test. The second part of the pair is the expression, which runs if the test
is true. The first true test will execute its expression. Only one will
run. If none are true, then none are run and the cond returns nil.
In this case, the cond is checking whether the variable line is equal to
"y", "n", and "q" in turn. The first one that is equal will have its
branch executed.
My personal preference is to separate the pairs with empty lines so they are easy to distinguish.
Try out the code. You should be able to reach every branch by giving different inputs.
Our -main function is getting kind of long, which I don't like, but it's also
unclear where we should break it apart. I'm going to leave it as it is until
it's doing something more substantial.
Looping
We need to loop. Every option we choose simply prints and exits. Let's analyze what each option should actually do:
"y"should start playing the game"n"should wait for 5 seconds then ask if they're ready again"q"should exit- else we should ask again for more input
Let's hold off on building the game and handle the other three cases. Writing those cases will help build the skills we need to do the game right.
First, let's wrap the let with a loop.
(defn -main [& args]
  (println "Welcome to the Rock, Paper, Scissors championship!")
  (println "Ready to play? Type y, n, or q to quit.")
  (loop []
    (let [line (read-line)]
      (cond
        (= "y" line)
        (println "Let's start the game!")

        (= "n" line)
        (println "You're not ready? Then I'll wait.")

        (= "q" line)
        (println "See you next time!")

        :else
        (println "I don't understand your input.")))))
We know in the default case, where we don't recognize the input, we need to ask again and loop.
Here's what that looks like:
(defn -main [& args]
  (println "Welcome to the Rock, Paper, Scissors championship!")
  (println "Ready to play? Type y, n, or q to quit.")
  (loop []
    (let [line (read-line)]
      (cond
        (= "y" line)
        (println "Let's start the game!")

        (= "n" line)
        (println "You're not ready? Then I'll wait.")

        (= "q" line)
        (println "See you next time!")

        :else
        (do
          (println "I don't understand your input.")
          (recur))))))
This code is not exactly as I would write it. We can clean it up later. I'm
showing it because it lets us work in small steps. Let's zoom in and see what's
happening. The :else branch is different from before:
:else
(do ;; do multiple things in a row
  (println "I don't understand your input.")
  (recur)) ;; recur means loop back to the top with a new value
Before, we were only doing one thing, so we could just put that thing as the
expression of the branch. But now, we need to do two things. To do multiple
things in a row and keep it as a single expression, we can wrap the things in a
_do form.
Compile and run this function and enter in some unrecognized input. It will open the text input box again.
We want it to prompt us again to tell us the options we have, so let's move that
println into the loop:
(defn -main [& args]
  (println "Welcome to the Rock, Paper, Scissors championship!")
  (loop []
    (println "Ready to play? Type y, n, or q to quit.")
    (let [line (read-line)]
      (cond
        (= "y" line)
        (println "Let's start the game!")

        (= "n" line)
        (println "You're not ready? Then I'll wait.")

        (= "q" line)
        (println "See you next time!")

        :else
        (do
          (println "I don't understand your input.")
          (recur))))))
Compile and run -main again and try an unknown input. It should now print the "Ready
to play?" message after the unknown input. It's looping!
Then try to quit ("q"). It should quit the loop since it's not running
recur in that branch.
The next one we'll face is the "n" branch. We need to recur but only after it
waits 5 seconds.
        (= "n" line)
        (do ;; multiple expressions
          (println "You're not ready? Then I'll wait.")
          (Thread/sleep 5000) ;; wait 5,000 ms
          (recur)) ;; loop again
Compile, run, and make it go through the "n" branch. Does it wait 5 seconds?
It should!
Playing the game
Our final branch to write is playing the game. Our function is already long, so let's break out the game playing into a new function.
Define a new function above -main in the file, like this:
(defn play-game []
  )
It doesn't do anything, but it's a good idea to try to compile it to make sure
the syntax is good. Move the cursor inside it and hit Alt-Enter.
Now add a call to that function in the "y" branch:
(= "y" line)
(do
  (println "Let's start the game!")
  (play-game)
  (recur))
We add a recur so that it will loop back to the menu when they quit the game.
Playing a game of Rock, Paper, Scissors is just a loop of the same thing over and over: You and your opponent choose Rock, Paper, or Scissors. We compare them. We figure out the result, and we update the score. Then we play again!
Let's set up the main loop of the game:
(defn play-game []
  (loop []
    (println "Choose (r)ock, (p)aper, (s)cissors, or (q)uit.")
    (let [line (read-line)]
      (println "You chose" line)
      (recur))))
Compile and run that function. You may want to add (play-game) to the rich
comment form to make it easier to run:
(comment
  (-main)
  (play-game))
It will keep prompting and reading forever. VS Code lets you hit Escape to
exit the loop.
Interpreting the input
We're reading a line from the player, but we're not doing anything with it
except print it out. Let's make a branch and handle the "q" case:
(let [line (read-line)]
  (if (= line "q")
    (println "Quitting game.")
    (do
      (println "You chose" line)
      (recur))))
This quits the loop because in the "q" branch it's not calling recur. The
function should return and the loop in the -main function should start again.
We're printing the letter that the player enters, but we want to do something with it. Right now, it's just a string. Clojure programmers tend to use keywords to represent named values. Here's how we're going to represent the three possible moves:
:rock:paper:scissors
We need to convert the string input from the user to one of those keywords. Clojure programmers tend to use a map to do this kind of conversion. It reads well as code and does the job nicely. Another option would be a function, but we've already seen functions and we need to learn maps. It's also more idiomatic to use a map in this case since the conversion is so simple.
Just above the definition of play-game, define a top-level var like this:
(def ->move {"r" :rock
             "p" :paper
             "s" :scissors})
We're using def to define a top-level var in the namespace. Var is the
correct name (not variable) in Clojure, but we won't get into why that is in
this tutorial. Vars are used to define constants. The name of this var is
->move, which is pronounced: "to move". It's a convention that conversion
functions use -> to indicate transforming from one thing to another.
We can then use the var as a lookup table to convert the input line. Let's do it
in the existing let so we don't nest more than we need to:
(let [line (read-line)
      move (get ->move line)] ;; convert user input to a keyword
  (if (= line "q")
    (println "Quitting game.")
    (do
      (println "You chose" move) ;; show the keyword chosen
      (recur))))
Let's compile it and run it to see what happens. Try the following inputs:
"r", "p", "s", "q", and "j".
All of them work as expected, except "j" which prints "You chose nil". "j"
is an invalid move, so we will want to have a branch to account for that. Let's
change the if to a cond and check for nil.
(cond
  (= line "q")
  (println "Quitting game.")

  (nil? move) ;; a nil move means it wasn't found in the map
  (do
    (println line "is an invalid move.")
    (recur))

  :else
  (do
    (println "You chose" move)
    (recur)))
Try it again with these changes.
Playing a round
Well, we're all set to play a real round! Let's make a new function called
play-round that takes the move the player chooses. Define it above play-game
and below ->move.
(defn play-round [player-move]
  )
Compile it. Then add a call to play-round in the correct branch:
:else
(do
  (println "You chose" move)
  (play-round move)
  (recur))
Let's think about what happens when we play a round. The player has already
chosen a move. The computer will have to choose a move. The computer will play
randomly. Then we compare the two moves. The result could be a win for the
player, a loss for the player, or a draw. The play-round function can do all
of that and return the result.
Add a let to store the computer's choice. For now, let's hardcode the choice
as :rock so we can test it more easily:
(defn play-round [player-move]
  (let [computer-move :rock]))
Now we want to compare the moves. The result will be represented as :win,
:lose, or :draw. The easy one is :draw. It happens when the moves are
equal.
(defn play-round [player-move]
  (let [computer-move :rock]
    (cond
      (= player-move computer-move)
      :draw)))
Compile and run the function and test if you can cause it to return :draw. You
should be able to by calling (play-round :rock). Passing in :paper and
:scissors should return nil.
The next step is a bit of a leap. You could use conditionals here to do it. If
you want, you can try it. However, I think there's a more elegant, data-driven
way. Just like with the ->move lookup table, using data to represent
relationships is very common in Clojure.
Define a top-level var called beats under the ->move var like this:
(def beats #{[:rock     :scissors]
             [:scissors :paper]
             [:paper    :rock]})
We can use this set to determine if x beats y if we know x and y. Here's how:
(defn play-round [player-move]
  (let [computer-move :rock]
    (cond
      (= player-move computer-move)
      :draw

      (contains? beats [player-move computer-move]) ;; check if the pair is in beats
      :win

      :else ;; not in beats, so it's a loss
      :lose)))
Compile it and run it with each of the three possible moves (:rock, :paper,
:scissors).
Before you move on, make sure you understand what's happening. Using a data lookup where other languages might use conditional logic is very common in Clojure. It's a small win here, but for more significant situations it can be very powerful. It's one of the reasons people like Clojure.
We're now at the point where we can choose a random move for the computer. We will again drive the program from data. There are many ways to do this, but I'll take you through one way that I think will be educational.
First, let's define a top-level var with all of the moves. Put it between
->move and beats.
(def moves [:rock :paper :scissors])
That's again a vector of all the moves represented as keywords.
Compile it.
Now we can use a built-in function for choosing a random element from a sequence:
(let [computer-move (rand-nth moves)]
 ...)
Compile play-round and try it out again. It's great, but now that I've done it
it seems like something is missing. How can we test it? We don't know what move
the computer has chosen.
Let's make the function play-round return a map of the play in that round:
(defn play-round [player-move]
  (let [computer-move :rock]
    {:player player-move
     :computer computer-move
     :result (cond
               (= player-move computer-move)
                :draw

                (contains? beats [player-move computer-move]) ;; check if the pair is in beats
                :win

                :else
                :lose)))
Now when you run (play-round :paper) you will see results like this:
{:player :paper, :computer :rock,     :result :win}
{:player :paper, :computer :paper,    :result :draw}
{:player :paper, :computer :scissors, :result :lose}
...
We can then manually evaluate whether they are correct.
That does it for play-round.
Printing the result
We're calling play-round in play-game, but we're not doing anything with the
result. Let's start by printing out a message. Eventually, we will want to keep
the score.
For now, let's print a summary of the round. Replace the branch to play a round with this:
:else
(let [result (play-round move)
      rstring (cond
                (= :win (:result result))
                "you win!"
                (= :lose (:result result))
                "you lose!"
                (= :draw (:result result))
                "it's a draw")]
  (println "You:" (:player result) ", Computer:" (:computer result) "," rstring)
  (recur))))
Let's step through this one line at a time. First, we're changing the do to
let. let has the same idea of executing its body expressions in sequence. We
use a let so we can bind names. We first bind result to the return value of
play-round. This will store the result of that round.
Then we print out the result. This will print a line like this:
You: :rock , Computer: :paper , you lose!
It's not perfect, but it's readable.
Finally, we recur to play another round.
Let's make the string slightly better. There are two problems I'd like to fix:
- There are spaces before the commas, which is not correct punctuation.
- Keywords have
:, which is valid Clojure but not what the player expects.
The first is due to the behavior of println. It prints all of its arguments
with spaces between them. To have tight control over spaces, we need to pass it
a single argument with the exact string we want to print. Let's do that.
We will need to concatenate strings. In Clojure, to concatenate strings, we use
the function str. Here is the old println:
(println "You:" (:player result) ", Computer:" (:computer result) "," rstring)
And here is a version using str:
(println (str "You: " (:player result) ", Computer: " (:computer result) ", " rstring))
Now it prints like this:
You: :rock, Computer: :paper, you lose!
Problem 1 is solved. Now let's get rid of the extra colons. What's happening is
that str, like println, converts the keywords to strings in a way that
includes the initial colon. Sometimes that's what you want. But if you want to
convert a keyword to a string without the colon, you have to do a little bit
more work. And to do that, you'll need to understand the structure of keywords.
Keywords have two parts to them:
- Name
- Namespace
Many keywords don't have anything for a namespace. They are unqualified. That's what we have. Some examples of unqualified keywords:
:rock:paper:draw:result
They're just a name, which is the string "rock", "paper", etc.
Some keywords have namespaces. They look like this:
:rock-paper-scissors.move/rock:rock-paper-scissors.move/paper:rock-paper-scissors.result/draw:rock-paper-scissors.round/result
I made up namespaces for those keywords. Notice the namespace comes before the name. They are separated by a slash. These are qualified keywords, or sometimes namespaced keywords. Adding a namespace makes your keywords more universally useful. For instance, if you find a keyword in some piece of data somewhere on the internet, if it has a namespace, you can better understand what it's for. You can track down the code that is meant to read it. And you can be more sure that nobody else is using it, especially if you include the domain name of the project in the namespace. This may seem like overkill, but it's very useful as your community grows and it's common practice in languages like Java.
Wow! Let's add that now.
(println (str "You: " (name (:player result)) ", Computer: " (name (:computer result)) ", " rstring))
Now it prints this:
You: rock, Computer: paper, you lose!
Maintaining state
We're printing a nice message and playing in a loop. We can generate lots of wins, losses, and draws, but we're not remembering them. Let's keep track of the number of each one.
We want to maintain state for each iteration of the loop. To do that, we can add
a binding to the loop expression, inside of the square brackets ([]). Let's
add a binding called score to the loop in play-game. It will be a map of
the three types of results, where the values start at zero and will be added to
each round.
(defn play-game []
  (loop [score {:win 0 :lose 0 :draw 0}]
    (println "Choose (r)ock, (p)aper, (s)cissors, or (q)uit.")
    ...))
Try to compile play-game. You should get an error printed to the REPL.
; Syntax error (IllegalArgumentException) compiling recur at (src/rock_paper_scissors/game.clj:50:11).
; Mismatched argument count to recur, expected: 1 args, got: 0
Let's do the easy one first. Here's our code when we detect an invalid move:
(nil? move)
(do
  (println line "is an invalid move.")
  (recur))
This call to recur needs an argument. We don't want to change the score since
it's an invalid move. So we pass in the score unchanged.
(nil? move)
(do
  (println line "is an invalid move.")
  (recur score))
If we try to compile again, we get the same error. We need to add the argument
to the other call to recur.
Here's the branch where we play a round:
:else
(let [result (play-round move)
      rstring (cond
                (= :win (:result result))
                "you win!"
                (= :lose (:result result))
                "you lose!"
                (= :draw (:result result))
                "it's a draw")]
  (println (str "You: " (name (:player result)) ", Computer: " (name (:computer result)) ", " rstring))
  (recur))
What do we want to pass to recur? We want the current score, but with the new
result added to it. There is a widespread pattern in Clojure that will become
easy with time, but when learning it it's kind of difficult. So let's jump into
the REPL for a minute. That way, we can play with the code to understand it.
In the REPL, define a var with the same kind of map as we had for the score.
(def score {:win 0 :lose 0 :draw 0})
Now, let's imagine we just had a win. We want to add one to the wins in that map so that it looks like this:
{:win 1 :lose 0 :draw 0}
Adding is easy. Especially adding one. In Clojure, there's a function called
inc that adds one to a number. But the number is inside of the map. We could
pull the number out, add one, then put the number back. Here's what that looks
like:
(let [w1 (:win score)    ;; pull out the number
      w2 (inc w1)]       ;; change it
  (assoc score :win w2)) ;; put it back in
Execute this in the REPL. You'll see that it works. This is fine. But in
Clojure, this is such a common pattern that there's a function that does the
same thing in one go. It's called update. Here's what it looks like:
(update score :win inc)
It may seem a little cryptic at first. Run it and try it. Then I'll explain.
Like I said, this is so common that we get used to reading this shorter version.
And it's so short we can put it right into the argument position of recur:
:else
(let [result (play-round move)
      rstring (cond
                (= :win (:result result))
                "you win!"
                (= :lose (:result result))
                "you lose!"
                (= :draw (:result result))
                "it's a draw")]
  (println (str "You: " (name (:player result)) ", Computer: " (name (:computer result)) ", " rstring))
  (recur (update score :win inc)))
Compile this and run it. It should give you the wrong behavior. What's wrong?
We're always incrementing :win regardless of the result.
We need to tell it what to increment. We notice that the score map contains
the same keys as we return in the :result of the round. I did that on purpose
because I kind of anticipated this. Because they're the same keys, we can use
the :result of the round directly, like this:
(recur (update score (:result result) inc))
Add that code and compile it, then play a game. Well, it isn't very fun because
we're not printing it out. Let's print the map out directly to ensure things are
working right. At the top of the loop, print out the score:
(defn play-game []
  (loop [score {:win 0 :lose 0 :draw 0}]
    (println score)
    (println "Choose (r)ock, (p)aper, (s)cissors, or (q)uit.")
    ...))
Then compile and run. It should show you the score incrementing.
Clojure feels so lovely because many things are easily printable. We can print all of the built-in values without any extra work. This means you can get much faster feedback about the behavior of your code.
Printing the state of the game
Although it was a useful step for us programmers, it wouldn't do to show it to the user. We want a better string. That should be easy since we've already seen the pattern. Try out this code:
(println (str "Wins: " (:win score) ", Losses: " (:lose score) ", Draws: " (:draw score)))
Compile everything (it's a good idea to compile the whole file from time
to time just in case you've forgotten to compile a function that has changed)
with Control-Alt-c Enter. Then run -main.
Well, what a fun game!! (not!)
But I hope you had fun writing it.
Review
In this tutorial, we reviewed some existing code and wrote a whole rock-paper-scissors game on the command line. We installed and configured a Clojure IDE in VS Code. We learned about the REPL and how to use it to evaluate code.
Next steps
Your Clojure journey is just getting started. This tutorial can be a first step. Here are the steps I suggest you take next:
-
Re-enable paredit and learn how to use it. It will take time, but that time will be well-invested. Clojure programmers think in and edit the structure of their code by moving parentheses around instead of typing them all. We use a lot of parens, and it's easy to miss one. That's why paredit helps us manage them.
- Calva's official Paredit Guide. It visually shows what each command does. It's a good way to understand what kinds of operations are available.
- The Calva Paredit Cheatsheet is a handy reference. It's more compact than the official guide, so it's great to have open in a tab for quick reference.
-
Learn about Clojure's data structures. Clojure has a rich set of data structures and functions to operate on them. It is impossible to master Clojure without mastering its data structures.
-
Do some Clojure exercises
Want the best way to learn Clojure?
Invest in yourself with my Beginner Clojure Signature Course.
- 8 fundamental modules
- 240 fun lessons
- 42 hours of video